Getting started
Installation and configuration
Inside your nuevoMailer zip package you will find the setUp.html which explains how to install/upgrade nuevoMailer.
In short, you create a database with a user and a password at your server, put these details in your settings file and upload your files to the server.
Then you follow the installation wizard (using your browser) to create the tables.
In short, you create a database with a user and a password at your server, put these details in your settings file and upload your files to the server.
Then you follow the installation wizard (using your browser) to create the tables.
In the package
- admin: Contains the files that you (the administrator) will use to operate the application.
- api: contains the latest api version.
- assets: this is where your newsletters images (html templates, zipped templates) are stored. The html editor has a file manager that enables you to upload and insert images in your newsletters and extract zipped newsletter templates.
- attachments: this is the folder for your newsletter attachments. The upload utility places the files you upload as attachments automatically in this folder.
- data_files: contains csv, txt files for importing subscribers or saving exported files.
- GeoIP2: contains the api, code and the GeoLite2 Free databases from MaxMind. Uploading it is optional if you want to use geolocation.
Instead of using the GeoLite2 Free Downloadable Databases you can purchase the commercial version for greater accuracy. - inc: contains the files with the necessary functions for the operation of nuevoMailer.
- install: contains the files to create (or upgrade) your tables when installing/upgrading. You should remove this folder after you have completed your installation.
- subscriber: contains the public pages that your subscribers use to interact with you.
- plugins:
- WordPress plugin: Read here about ways to bridge nuevoMailer and WordPress.
- SalesForce plugin. Demonstrates how to connect to SalesForce, query your SF tables and insert subscribers in nuevoMailer. It is provided as proof of concept and further development is required for tighter integration. - The .htaccess file is optional but good to have. Its only purpose is to disallow directory browsing and indexing of your files and folders (Apache only). The web.config file is the equivalent and only needed for Windows servers.
- zip-templates: contains zipped html templates with images. The html editor has a utility to upload zip files and/or extract them and automatically create newsletters.
Key concepts
The most basic entities in nuevoMailer are the subscriber and the newsletter.
All other entities and activities are based on these two.
All other entities and activities are based on these two.
- A subscriber is someone from whom you have at least an email address.
- A newsletter is the content that you send.
- A mailing list is a way of grouping your subscribers.
- A campaign is the activity of sending a newsletter to subscribers.
- Any newsletter can be sent to any mailing list (or a combination of lists or to all subscribers).
- Terms such as opt-in, sign-in, sign-up are equivalent. They mean that a subscriber registers to receive your newsletters.
- Terms such as newsletter and email are used interchangeably. This is because a newsletter is actually delivered via email.
- E-newsletter is an electronic newsletter: a newsletter that is delivered electronically. In the context of email marketing and throughout this guide, for simplicity we use just newsletter.
- Email marketing is marketing done via emails. It is another channel of electronic marketing.
Basic configuration
Reading this page means that you have successfully installed nuevoMailer. Now some basic, initial configuration is necessary to complete your set-up.
Menu > Tools > Configuration & settings
- First you will update some basic settings.
- Complete your General settings.
You can leave certain values unchanged for now. But the installation URL is important for further testing. - Change your Encryption password. Use 8 alphanumeric characters. Then update immediately your administrator account password before you log out.
- Go to Menu > Tools > Administrator accounts and change your administrator account details.
As soon as you change your administrator email, username and password, log out and login again with your new credentials.
Tip: add a second administrator account that you will use only for the cron jobs.
Tip: add yourself both as administrator and subscriber with the same email. In this way you can test newsletter personalization without sending a full campaign but just a single email. -
Create an html newsletter and try to upload an image or an attachment.
Menu > Newsletters > Html newsletters > Create new
Since v.8.6 the file managers alert you about folder write permissions and the maximum file size allowed when uploading. For earlier versions read below.
If you see the message "Upload failed" then you may want to give write permissions / chmod755 to these folders: assets, attachments, data_files. In some cases chmod777 may be required.
To verify your permissions, test with a small size file first. Larger files may be blocked due to your php.ini settings.
If you can upload a small file then your permissions are Ok. But if you cannot upload a larger file then you are probably exceeding the allowed limit on our PHP settings. - Create a Sender profile.
Administrator roles
Menu > Tools > Administrator accounts > View & edit
- The first and default admin account with ID 1 cannot be deleted, neither edited by other administrators and has access to all features and options. Let's call this Master account.
- If needed you can open more administrator accounts and limit their access to specific sections of the administration panel.
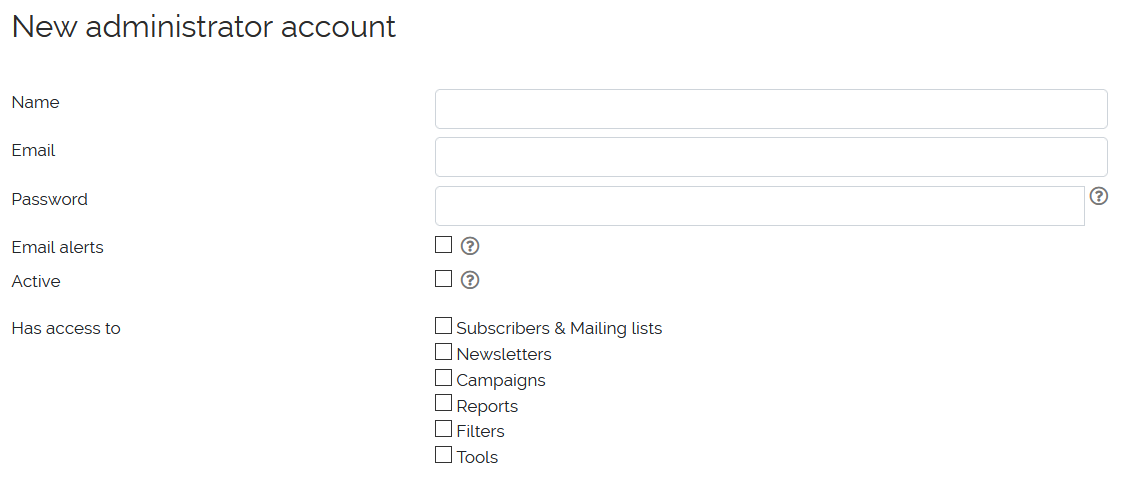
- Important: if an administrator has access to Tools then he can create and edit other administrator accounts except the Master account.
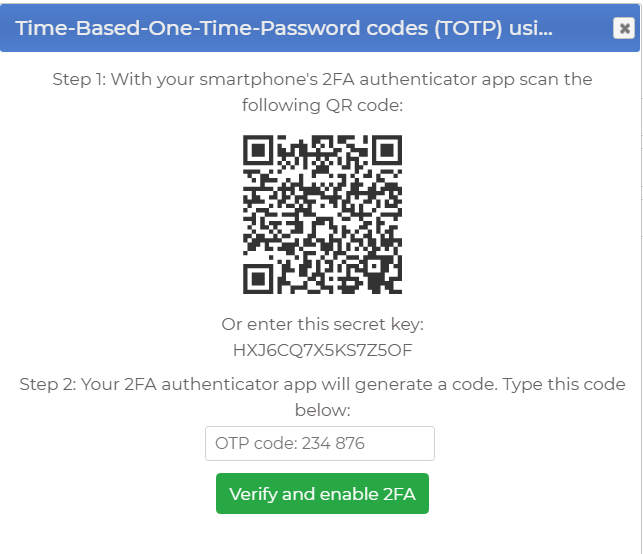
Two Factor authentication (2FA)
Two Factor Authentication was introduced ib nuevoMailer v.9 and extended in v.9.6
2FA works by adding an extra layer of security beyond just your email and password by requiring an additional login credential such as a pin code or a time-based-one-time-password (TOTP).
2FA is enabled at administrator level. Two methods are available:
- Pin codes sent by email. Pin codes expire after 5 minutes and they are not reusable.
- TOTP codes generated with your smartphone's 2FA authenticator app.
In order to use this method, you must install an app compatible with time-based one-time password (TOTP) standards. You may download an app from Apple or Google-Play App Stores. Here are some compatible apps:- Google Authenticator (most commonly used)
https://play.google.com/store/apps/details?id=com.google.android.apps.authenticator2
https://apps.apple.com/app/google-authenticator/id388497605 - Microsoft Authenticator
https://play.google.com/store/apps/details?id=com.azure.authenticator
https://apps.apple.com/us/app/microsoft-authenticator/id983156458 - LastPass Authenticator
https://play.google.com/store/apps/details?id=com.lastpass.authenticator
https://apps.apple.com/us/app/lastpass-authenticator/id1079110004 - Twilio Authy
https://play.google.com/store/apps/details?id=com.authy.authy
https://apps.apple.com/us/app/twilio-authy/id494168017
- Google Authenticator (most commonly used)
Key points
- Before activating the first 2FA method (pin codes sent by email) make sure email sending works for the default sender profile. A simple test is to use the Password Reminder utility that you have at the login page.
- The master administrator (with ID 1 or any administrator with access to the Tools section) can change the authentication method of another admin to either
(a) None or
(b) Pin codes sent by email. - In order to activate the second 2FA method (TOTP codes) an administrator must log in himself and by using his smartphone scan a QR code, validate and confirm.
Sender profiles
Menu > Tools > Sender profiles
Sender profiles are like different sender identities. Each time you create a campaign, an autoresponder or an opt-in form you also choose the sender profile you want to use.
Each profile has its own,
Sender profiles are useful for those managing several different websites but not only.
For example you may want to use the same sender identity but different sending methods (incl. smtp servers) for your campaigns, autoresponders and opt-in forms.
You need at least one sender profile in order to use nuevoMailer.
No need to complete all settings when starting but an email sending method is required for further testing.
As for the other settings here is how they are used.
No need to complete all settings when starting but an email sending method is required for further testing.
As for the other settings here is how they are used.
- The welcome settings are required if you plan to use opt-in forms.
- The confirmation-required (double opt-in) settings are required if you plan to use double opt-in with your opt-in forms.
- The goodbye/opt-out settings are usually required since you will probably have to use opt-out links in your newsletters.
- Already subscribed settings: good to have for a better subscriber experience.
- Subscriber account not found: good to have for a better subscriber experience.
Tracking domain: enables you to have tracking links that point to a different domain (from the one that nuevoMailer is installed).
For example,
Installation domain is mailer.a-domain.tld
Tracking domain is email.b-domain.tld
You then create an A (DNS) record at email.b-domain.tld that points to mailer.a-domain.tld.
This helps in cases where a-domain is blocked and also when sending a campaign on behalf of another website (or client).
Since v.9.7, redirection URLs can be personalized with subscriber data. E.g. ...?email=[sub_email].
Good to know: the custom sender settings (at campaign level) override the Sender settings defined at Sender profile level.
The Snooze option
(Since v.9.8)
(Since v.9.8)
The snooze option gives your subscribers the opportunity to suspend or pause emails for a while instead of un-subscribing.
It is used together with Opt-out reasons and defined in the Goodbye settings of your sender profile.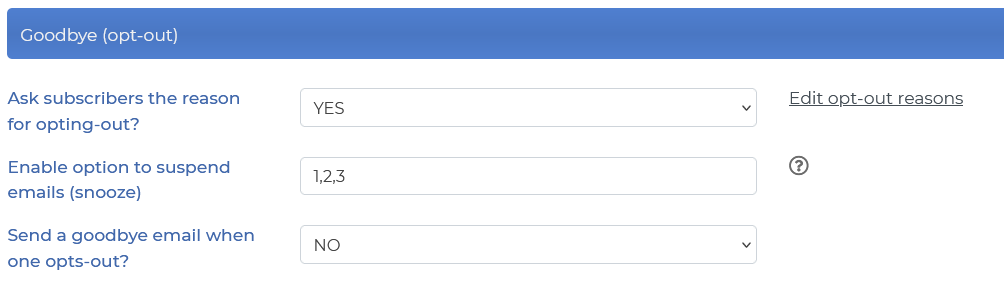 The values 1,2,3 refer to months. If active, when the subscriber is presented with the opt-out reasons he will also see these options at the top:
 In the above example we used 1,2,3 for demonstration but you can use just one option (recommended).
The wording can be changed in /inc/languages.php.
It is used together with Opt-out reasons and defined in the Goodbye settings of your sender profile.
Snooze is a great way to retain subscribers and reduce opt-outs.
Oracle reported an 82% reduction in unsubscribes by using this tactic (Source).
Oracle reported an 82% reduction in unsubscribes by using this tactic (Source).
The values 1,2,3 refer to months. If active, when the subscriber is presented with the opt-out reasons he will also see these options at the top:
In the above example we used 1,2,3 for demonstration but you can use just one option (recommended).
The wording can be changed in /inc/languages.php.
Tips
Avoid using too many options. It is recommended to use one snooze duration option.
Avoid using too long a period since there is always a risk of your subscribers forgetting you.
For B2B a 3 month pause is the longest recommended. For B2C or other frequent senders consider a shorter pause of 1 month.
Snooze appears in your reports
 You will see these subscribers in your Opt-outs report but snoozes are not opt-outs. The subscriber keeps his list subscriptions.
How it works?
It updates a subscriber field with a "Snooze until" date. This date is taken into consideration when creating and sending campaigns.
The snooze option appears also inside the subscriber portal.
You will see these subscribers in your Opt-outs report but snoozes are not opt-outs. The subscriber keeps his list subscriptions.
How it works?
It updates a subscriber field with a "Snooze until" date. This date is taken into consideration when creating and sending campaigns.
The snooze option appears also inside the subscriber portal.
Preparing a Welcome back
It is a good idea to send a first warm-up newsletter to your subscribers to inform them that the pause period has ended.
This can be automated by using an Autoresponder.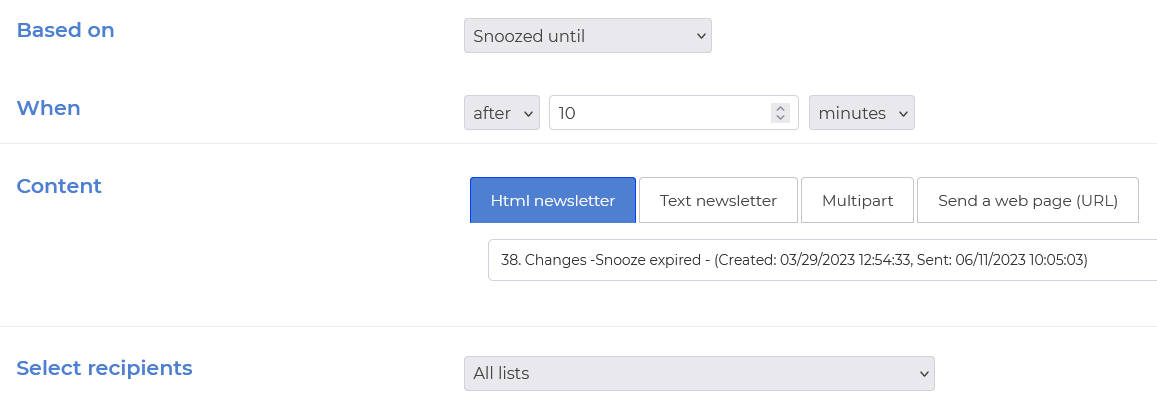
It is a good idea to send a first warm-up newsletter to your subscribers to inform them that the pause period has ended.
This can be automated by using an Autoresponder.
Email sending methods
Menu > Tools > Sender profiles
Email sending method is set as sender profile level.
SMTP: if you want to use SMTP add an SMTP server first: Menu > Tools > SMTP servers.
Learn how to configure your SMTP servers in the next paragraph.
Learn how to configure your SMTP servers in the next paragraph.
nuevoMailer supports the following methods:
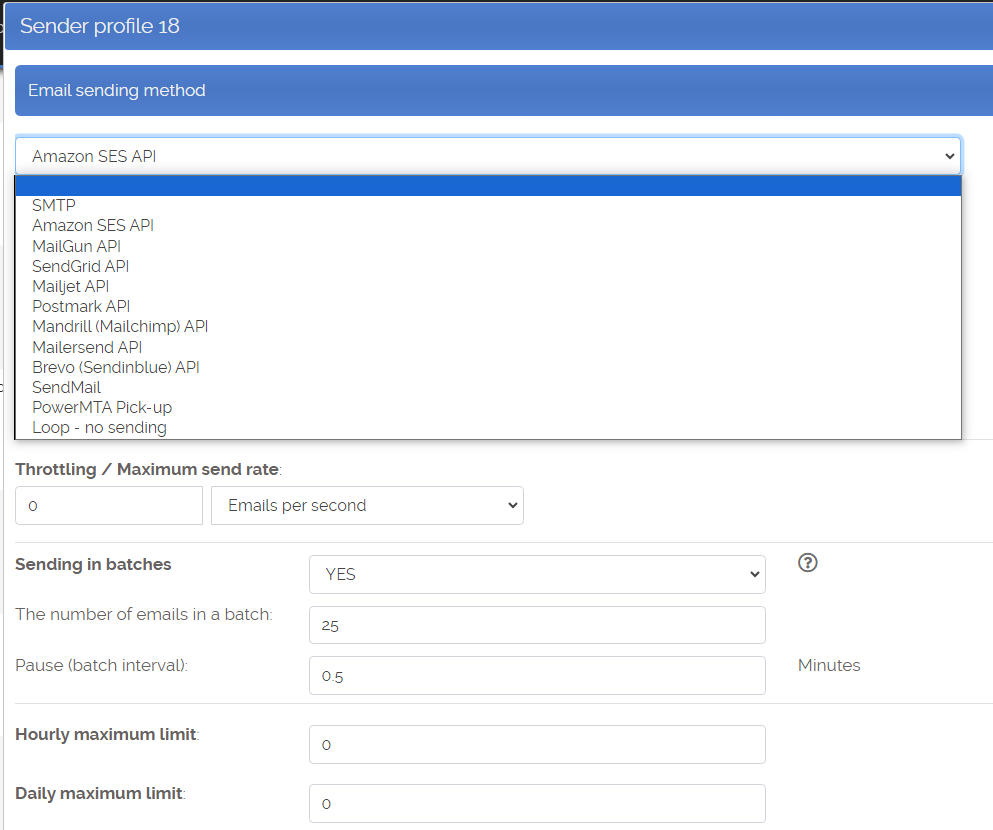
You can learn more about the different sending methods here. Depending on the selected method you will see different options.
You can learn more about the different sending methods here. Depending on the selected method you will see different options.
- Throttling / Maximum send rate
You can use 0 for unlimited (meaning as fast as the server can send). - Email account to send bounces (Return-path):
This defines where bounced emails will return. So you should add a bounce server to process this mailbox. Go to:
Menu > Tools > Bounce manager settings > Bounce servers
If using Amazon SES, SendGrid, Mailjet, MailGun, Mailersend, Mandrill, Postmark and Brevo (Sendinblue) , bounces and complaints are processed with webhooks and there is no need to define a mailbox for bounces.
If using SMTP the return path address and thus the bounce server to use is set for each smtp server specifically.
Sending with Amazon SES?
There are two ways to use Amazon SES. Either as an SMTP server or by using the "Amazon SES api".
The performance is more or less equivalent. But since it depends on your and your subscribers location it is better to test both and decide.
Attention: your Amazon SMTP credentials are different from your access key id and secret access key.
Verify that your email sending method works
Create a new html newsletter and send a single test email directly from the html editor. You can choose the Sender profile you want to use on the spot. If you see a hard error or do not receive the email after a few minutes, adjust again your sending method.
Create a new html newsletter and send a single test email directly from the html editor. You can choose the Sender profile you want to use on the spot. If you see a hard error or do not receive the email after a few minutes, adjust again your sending method.
Create and send a campaign to your test list
After you have a working sending method create a mailing list with 1-3 emails of yours.
Create and send a campaign to this list.
Go to the Summary report and verify that views & clicks are captured.
If not, then check your Views and clicks tracking options in your Configuration & settings. Double check also the "installation URL" and repeat your test.
SMTP servers
Menu > Tools > SMTP servers
Click "Add new smtp server". Enter the server name or IP and click "Add".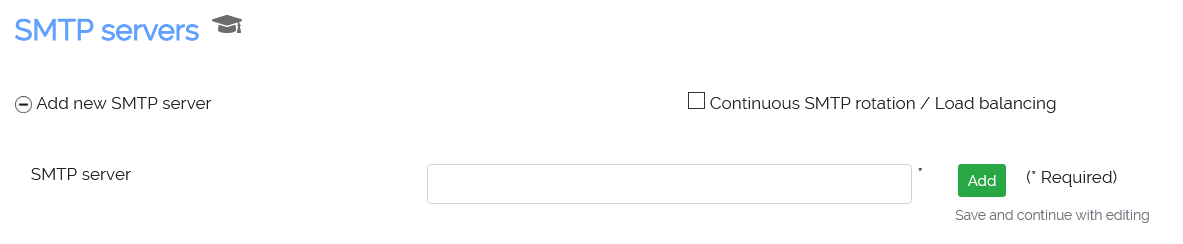
Click "Add new smtp server". Enter the server name or IP and click "Add".
Then continue by clicking the "Edit" icon .

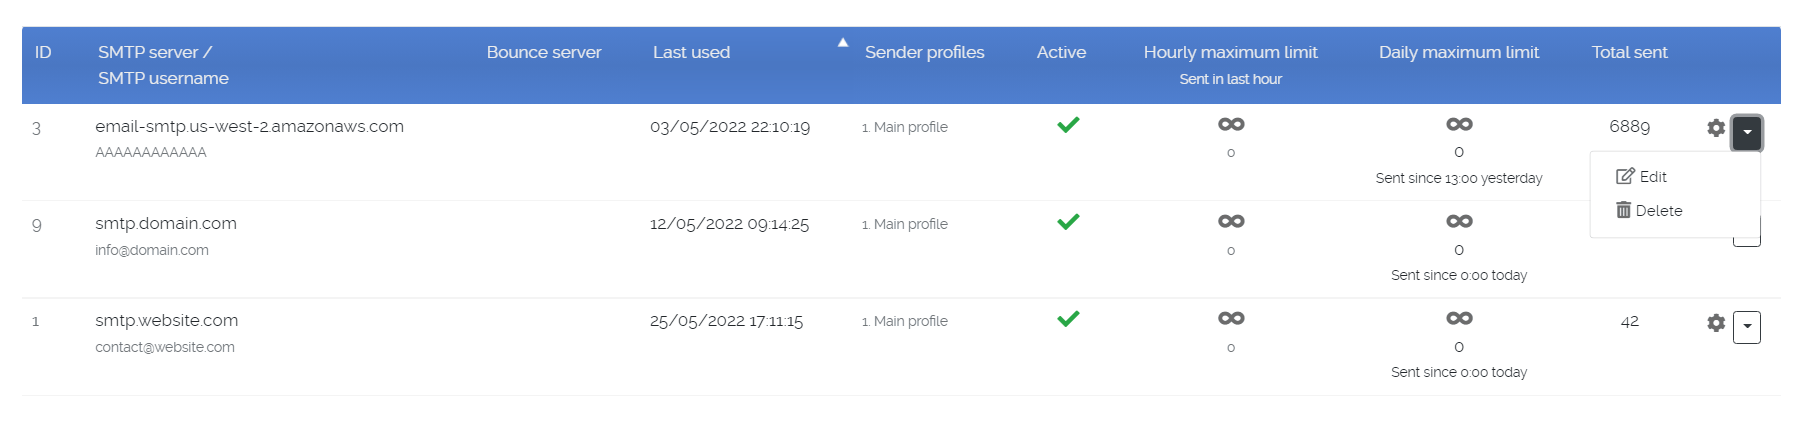
- You can define as many smtp servers as you want. Only active smtp servers are used. Temporarily you may choose to de-activate a server instead of deleting it.
- The same smtp server can be used in different sender profiles.
- Check the smtp connection by clicking this icon . Save your changes first.
- To fully test an smtp server set it as Active, go to your Sender profiles and assign the smtp server to a sender profile. then send a test email from the newsletter editing form.
- For each smtp server you can set Hourly and Daily quotas. No cron job required for resetting.
- You can also set which hour the daily limit resets and starts to count again.
-
Continuous SMTP rotation / Load balancing
When enabled each batch is spread evenly among the available SMTP servers. When not, SMTP servers rotate with every new batch. - Bounce server: each smtp server may use its own bounce server.
So in this drop-down you will see a list of all your bounce servers for which you have a Return-path defined.
The Return-path is simply an email account/mailbox. When defined, it adds an email header that tells the server where to send an email that bounces.
You will see it in the email headers like this: Return-Path: <postmaster@domain.com>.
-
SMTP anti-flood: close the smtp connection after sending X emails and pause for Y seconds.
Some smtp servers may have a limit on the number of emails you can send during a single smtp connection.
The purpose of smtp anti-flood is to close and reopen the smtp connection after sending a number of emails.
Smtp anti-flood happens inside a batch. So the values you use should be considerably lower than the batch settings.
Typical values may be:
First consider your smtp provider requirements. They may have specific instructions for these values.
Number of emails can be anything between 10-100 emails. The pause can be 5 seconds or more.
You should set these values in relation to your batch settings.
To disable smtp anti-flood use 0 for both values.
Using smtp anti-flood improves your deliverability. -
Throttling / Maximum send rate
Especially useful when using Amazon Simple Email Services (SES).
To de-activate/disable enter 0. - When you change the availability of an smtp server from Selected lists to All campaigns it is automatically removed from the lists it was assigned to. The same happens when you delete it.
- Daily & Hourly maximum limit: Enter 0 for unlimited.
The daily limit starts to count from the value you will use for Daily count starts at ....
The hourly limit counts from this running hour's :00 minute. - Total sent is just a counter.
-
Custom headers (optional)
Some SMTP providers may require you to add some custom email headers in your emails.
You can add custom headers in this manner. One header per line and end with a semicolon ;
In the example below the last two lines will be replaced with the subscriber and campaign IDs ([sub_id] & [camp_id].
For subscriber data you can use practically any personalization smart tag that you use in a newsletter.Header-field-1 => value-1; Header-field-2 => value-2; X-MC-Track => clicks_textonly; X-Message-Info => value; X-recipient-id=>[sub_id]; X-campaign-id=>[camp_id];
Using 3rd party SMTP services
nuevoMailer works with all major SMTP-relay service providers such as Mandrill, SendGrid, MailGun, Amazon SES, AuthSMTP, Mailjet, Smtp.com (and many others).
nuevoMailer works with all major SMTP-relay service providers such as Mandrill, SendGrid, MailGun, Amazon SES, AuthSMTP, Mailjet, Smtp.com (and many others).
Bounce servers
Menu > Tools > Bounces processing settings > Bounce servers- A bounce server is a mailbox that collects the bounces resulting from your campaigns.
When you process bounces you are in fact opening and reading this mailbox.
So the settings you will use are what we call incoming mail settings.
These are usually the same as the ones you use when setting-up an email account in your email client (Outlook, Thunderbird etc) or app. - Since nuevoMailer v.8.6 you may define several bounce servers and you can assign a bounce server to one or more smtp servers .
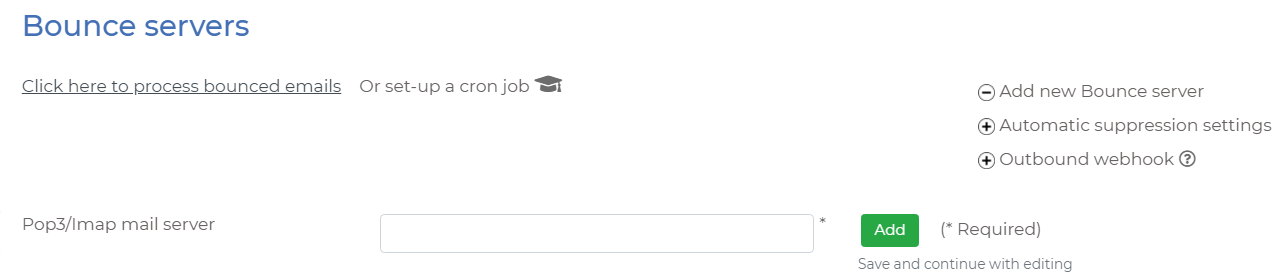
 Click on the "Edit" icon to continue with more details.
You can test a connection by clicking this icon . Save your changes first.
 It is your mailbox provider that will tell you what settings to use.
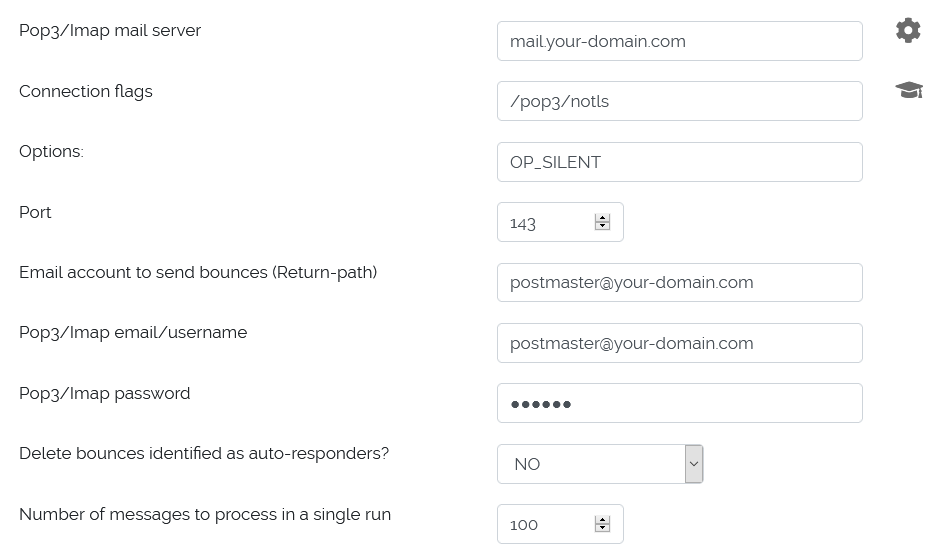
Here are the some popular settings that work in most cases:
- Most servers will use ports 110 or 143 and for connection flags /pop3/notls
- For imap/secure connections use port 993 and connection flags /imap/ssl/novalidate-cert
- For "Options" always use OP_SILENT unless specifically instructed otherwise.
- The Return-path is usually the same as the Pop3/Imap email/username. Without a Return-path this bounce server is not included in the processing.
- Gmail settings: port 993, server imap.gmail.com, connection flags /imap/ssl/novalidate-cert.
If your Google account uses 2-Step-Verification then create an App Password and use it instead of your regular password. All other settings stay the same.
The same applies when using Gmail as an smtp server.
Important: in order to process the bounced emails do not download them from the server without leaving a copy at the server.
They must be at the server so that the bounce manager can find them and process them.
Connect the Bounce server to an Smtp server
After you configure your bounce server edit your smtp server and select which bounce server it should use.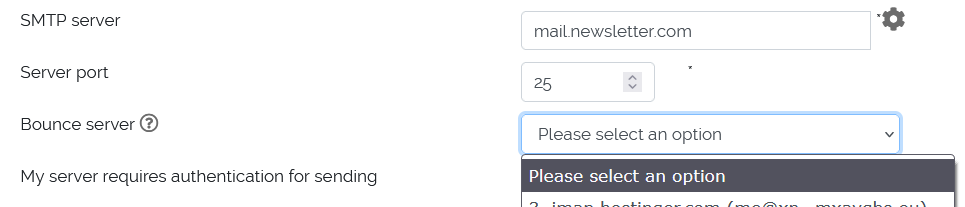
After you configure your bounce server edit your smtp server and select which bounce server it should use.
Processing bounces
You can do it manually or with a cron job.
- With a cron job. Refer here for details.
- Manually:
Menu > Tools > Bounces processing settings > Process bounced emails
In this page you will also find several utilities for cleaning up your subscribers.
The bounce manager does not automatically delete subscribers from your system.
It simply updates a soft/hard bounce counter for each.
We recommend using the automatic suppression settings.
If any of these conditions is met then the subscriber is automatically suppressed.
Normally one hard bounce or complaint should be enough to justify a suppression. A hard bounce can be false sometimes so you can use 2 or 3. For soft bounces you can use a larger number. Usually 3 is a good indicator.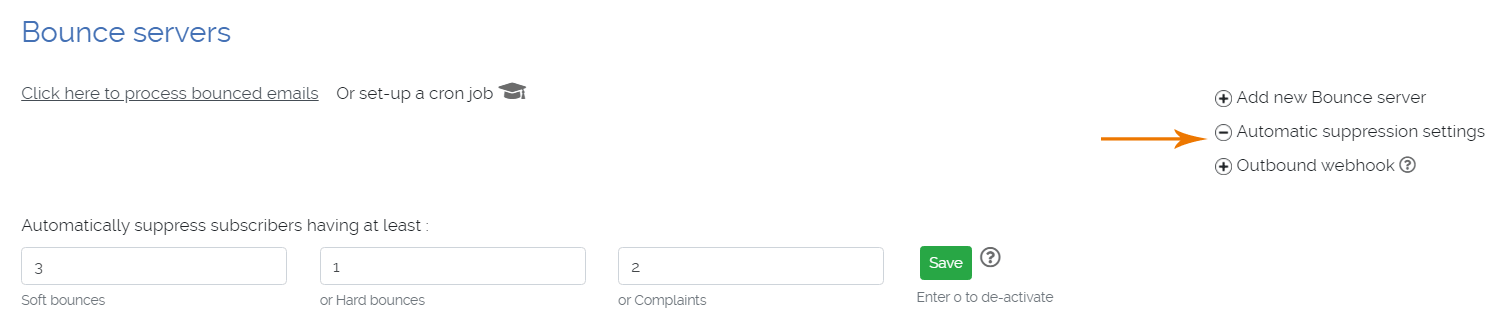 By doing an advanced search you can further isolate and process these subscribers according your operational requirements. E.g. assign them to a bucket list.
If any of these conditions is met then the subscriber is automatically suppressed.
Normally one hard bounce or complaint should be enough to justify a suppression. A hard bounce can be false sometimes so you can use 2 or 3. For soft bounces you can use a larger number. Usually 3 is a good indicator.
By doing an advanced search you can further isolate and process these subscribers according your operational requirements. E.g. assign them to a bucket list.
Not using SMTP?
In this case, depending on your sending method you select the bounce server you want to use in your sender profile settings.
For SendMail or Pick-up (PowerMTA) you will see this option: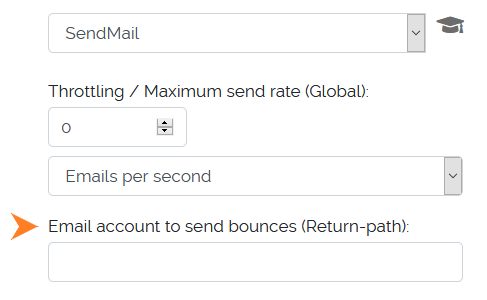 Enter here the mailbox where you want to send the bounces and create a bounce server (having the same Return-path) to process it.
For Amazon SES, SendGrid, MailGun & Mailjet (smtp or api) you can create dedicated webhooks as explained in the following paragraphs.
In this case, depending on your sending method you select the bounce server you want to use in your sender profile settings.
For SendMail or Pick-up (PowerMTA) you will see this option:
Enter here the mailbox where you want to send the bounces and create a bounce server (having the same Return-path) to process it.
For Amazon SES, SendGrid, MailGun & Mailjet (smtp or api) you can create dedicated webhooks as explained in the following paragraphs.
3rd party Webhooks (bounces, complaints)
When you send using any of the following providers, you can setup webhooks so they automatically send notifications about bounces, complaints and deliveries to nuevoMailer.
nuevoMailer processes these notifications and updates your campaign statistics and subscriber records.
In the next paragraphs you will find instructions on how to setup these webhooks and what these do.
nuevoMailer processes these notifications and updates your campaign statistics and subscriber records.
In the next paragraphs you will find instructions on how to setup these webhooks and what these do.
- Amazon SNS (when sending with Amazon SES, smtp or api)
- MailGun (smtp or api)
- SendGrid (smtp or api)
- MailJet (smtp or api)
- Smtp.com (smtp)
- Mailersend (smtp or api)
- Mandrill / Mailchimp (smtp or api)
- Postmark (smtp or api)
- Brevo / Sendinblue (smtp or api)
Amazon SNS for bounces / complaints
When you send your campaigns using Amazon SES (smtp or api) you must set-up Amazon simple notification services (SNS) in order to process the bounced emails.
Amazon overwrites your <bounce-to> email & settings and adds it's own Return-path header.
We explain here how you can set-up Amazon SNS.
Amazon overwrites your <bounce-to> email & settings and adds it's own Return-path header.
We explain here how you can set-up Amazon SNS.
- Grab your endpoint URL from nuevoMailer. Go Menu > Tools > Bounce manager settings > Process bounced emails.
At the bottom you see: The above URL is your Endpoint. Copy it from your own installation!. Replace apiKey with your own by going to Menu>Tools>Administrator accounts>View & edit.Make sure that the Api key is from an active administrator account.
 So you have your own Endpoint URL. Now go to Amazon and log in your account.
- Log in to https://console.aws.amazon.com/ with your credentials. Then search for the SNS service. You will see this screen:
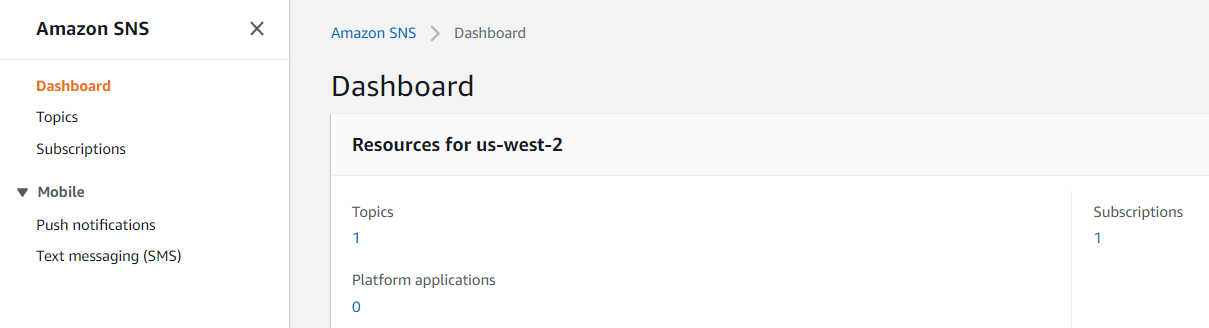 Click on Topics at the left side menu and then click the orange button at the right side Create topic.

-
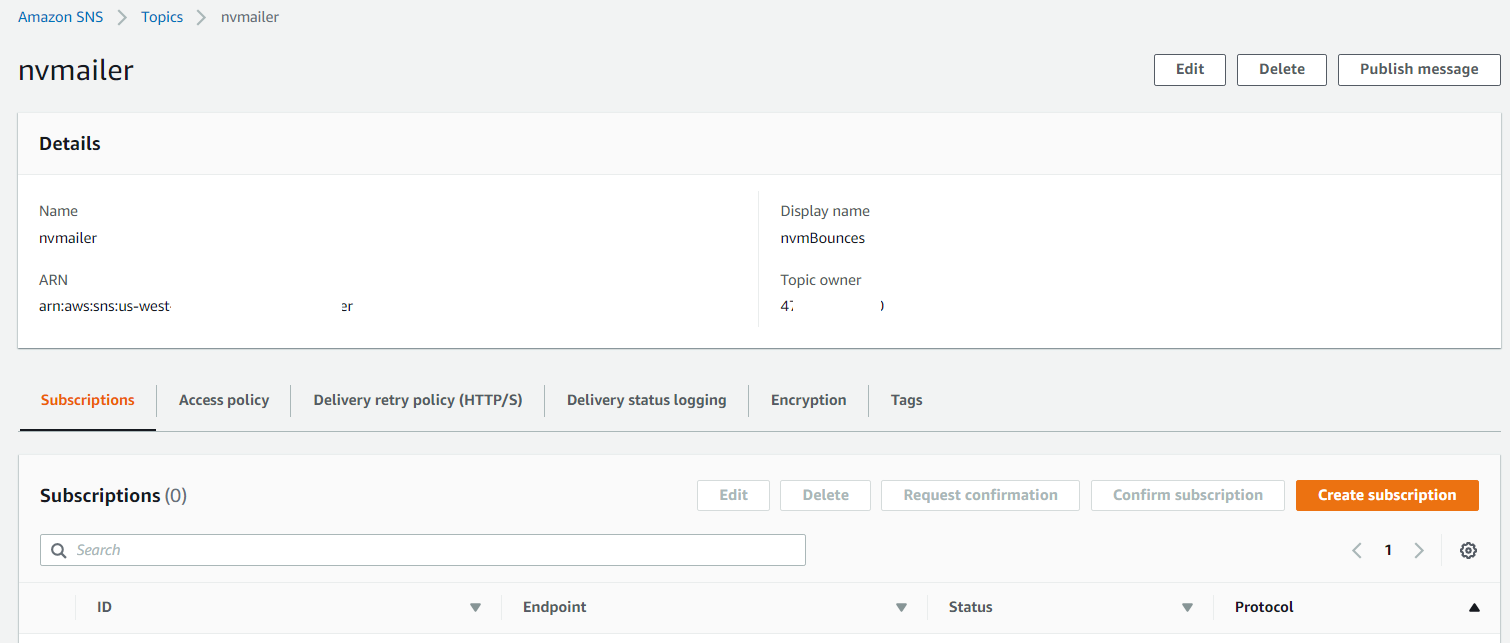
Create a "Standard" Topic
Under Details enter a name for this topic. Leave all the rest as-is and click the orange button Create topic at the bottom of this screen.

-
Create a subscription for this topic
As soon as you create your topic you will see this screen:Click the Subscriptions tab and then the orange button Create subscription. This is where you will enter your endpoint.
Choose either HTTP or HTTPS depending on your installation.
Click the orange button Create subscription at the bottom of the screen to save it. -
The subscription will initially appear as Pending verification.
The system will auto approve it and change it to Confirmed. It may take a while.
On the left side menu click Subscriptions to see it: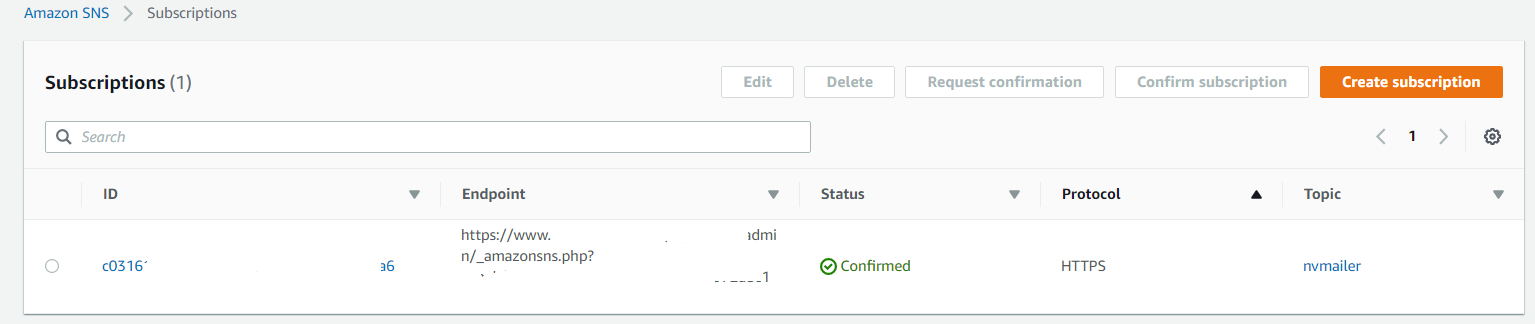 If confirmation is taking longer check your log file to see if something went wrong with your endpoint: Menu > Campaigns > View log file.
In case you correct something and make changes click on the "Request Confirmation" button. - Now go to the Amazon SES service (we will use the new SES console in this guide).
You will create Notifications for the domain and for the individual email accounts that you have added and verified.
At the left side panel under Configuration click on Verified identities. Then click on each identity whether that is a domain or email address.
Then click the Notifications tab.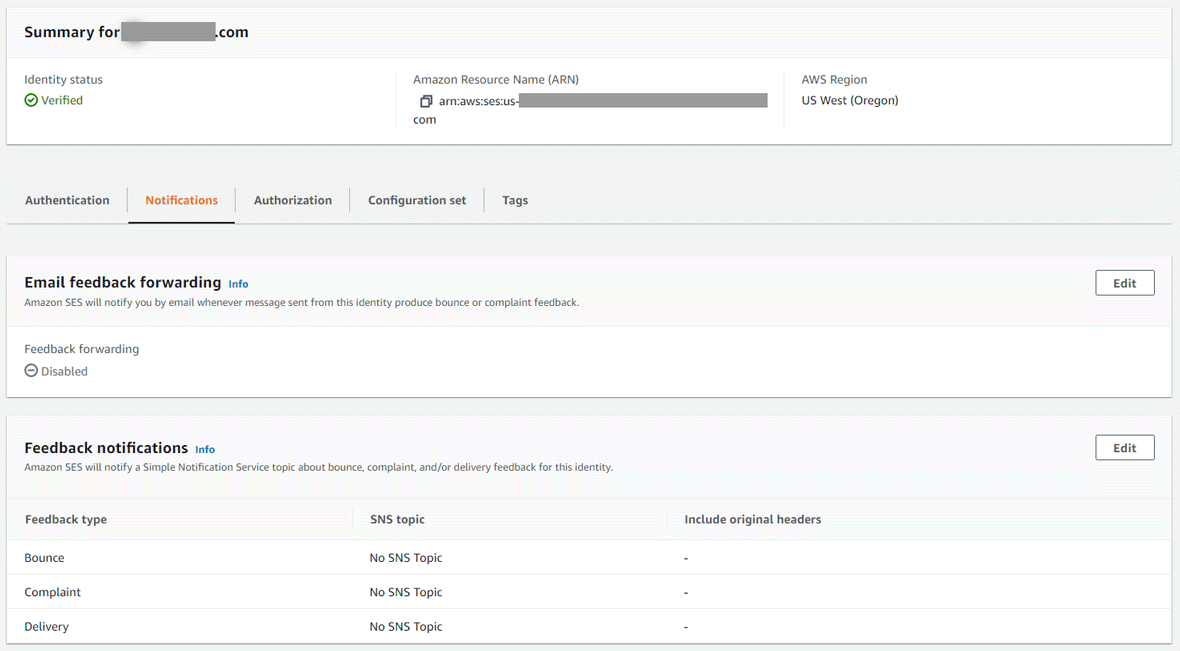
Click “Edit” in "Feedback notifications" section. From the drop down menus select the SNS topic you created earlier.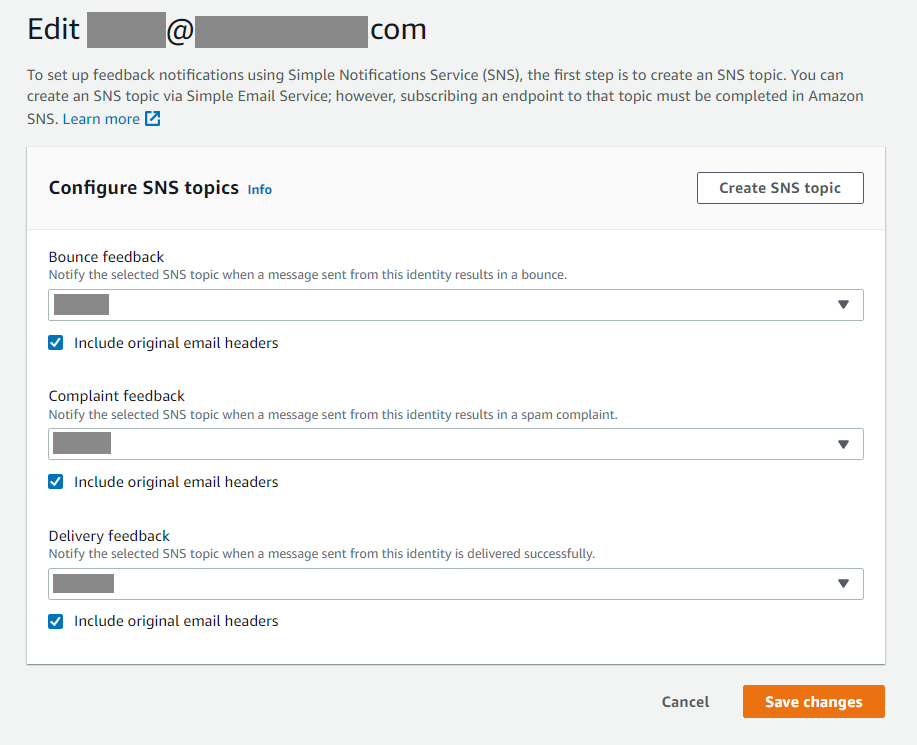
- Repeat step 6 for each of your Amazon verified email accounts. Include/add also the email account that you direct bounces in nuevoMailer (not required for v.8.6 or later).
-
Test your integration
Create a new list and add these email accounts:
bounce@simulator.amazonses.com
complaint@simulator.amazonses.com
Send a campaign to this list. Then look at your complaints, bounces and opt-outs reports. You should see entries like:
How nuevoMailer handles these events
- Permanent bounce
- Updates subscriber hard bounces & Mail Delivery Info fields
- Adds record into the Bounces table
- Soft / Transient bounce
- Updates subscriber soft bounces & Mail Delivery Info fields
- If the bounce sub-type is not "general" adds also a record into the Bounces table
- Since v.9.7, transient bounces that have sub-type "general" are ignored by default. You can change this behavior in /inc/classUtil.php.
- Complaint
- Updates subscriber complaints & Mail Delivery Info fields
- Adds record into the Complaints table
- Delivey notificaion
- Updates campaign's delivered counter
In order to suppress subscribers having soft, hard bounces and complaints set your automatic suppression thresholds.
MailGun webhooks
If you use MailGun smtp or api then you can set-up Webhooks in your MailGun panel and receive notifications for these two events: failures (bounces) and spam complaints.
First add this custom header to your MailGun smtp server in nuevoMailer:
First add this custom header to your MailGun smtp server in nuevoMailer:
X-Mailgun-Variables=> {"recipient_id": "[sub_id]", "campaign_id": "[camp_id]"};
Prepare your Webhook URL. This is:
http://www.domain.com/mailer/admin/_mailGunWH.php?apiKey
Replace with your own domain, path and apiKey (from your nuevoMailer administrator accounts). Write it down.
Inside your MailGun panel click on "Sending" and then on "Webhooks".
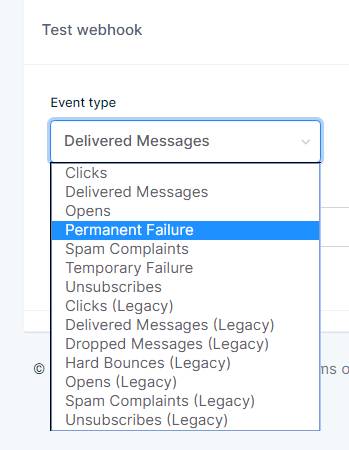
First test your URL. Choose "Event type" Permanent failure. You will know if it worked. At the same time log in your nuevoMailer and go Menu > Campaigns > Activity log. If your api key was wrong you will see it here.
http://www.domain.com/mailer/admin/_mailGunWH.php?apiKey
Replace with your own domain, path and apiKey (from your nuevoMailer administrator accounts). Write it down.
Inside your MailGun panel click on "Sending" and then on "Webhooks".
First test your URL. Choose "Event type" Permanent failure. You will know if it worked. At the same time log in your nuevoMailer and go Menu > Campaigns > Activity log. If your api key was wrong you will see it here.
After testing click on the "Add Webhook" green button and add 3 webhooks for these event types:
- Delivered messages (new since v.9)
- Permanent Failure
- Spam Complaints
- Temporary failure (optionally - do not add it if you see that your are getting too many notifications that do not result in hard bounces)
How nuevoMailer handles MailGun events
- Permanent bounce (event=failed, severity=permanent)
- Updates subscriber hard bounces & Mail Delivery Info fields
- Adds record into the Bounces table
- Soft / Temporary bounce (event=failed, severity=temporary)
- Updates subscriber soft bounces & Mail Delivery Info fields
- Adds record into the Bounces table
- Complaint
- Updates subscriber complaints & Mail Delivery Info fields
- Adds record into the Complaints table
- Delivey notificaion
- Updates campaign's delivered counter
In order to suppress subscribers having soft, hard bounces and complaints set your automatic suppression thresholds.
SendGrid webhooks
If you use SendGrid smtp or api then you can set-up Webhooks in your SendGrid panel and receive notifications for these events: Delivered, Bounced and Spam report.
Add this custom header to your SendGrid smtp server in nuevoMailer:
X-SMTPAPI=> {"unique_args":{"recipient_id":"[sub_id]","campaign_id":"[camp_id]"}};
Then prepare your Webhook URL. That is:
http://www.domain.com/mailer/admin/_sendGridWH.php?apiKey
Replace with your own domain, path and apiKey (from your nuevoMailer administrator accounts). Write it down.
http://www.domain.com/mailer/admin/_sendGridWH.php?apiKey
Replace with your own domain, path and apiKey (from your nuevoMailer administrator accounts). Write it down.
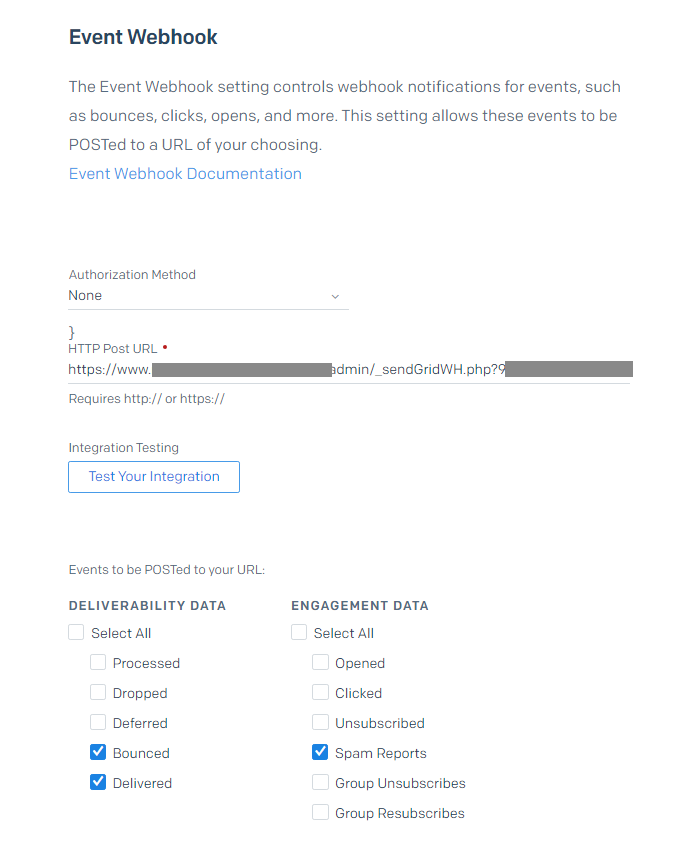
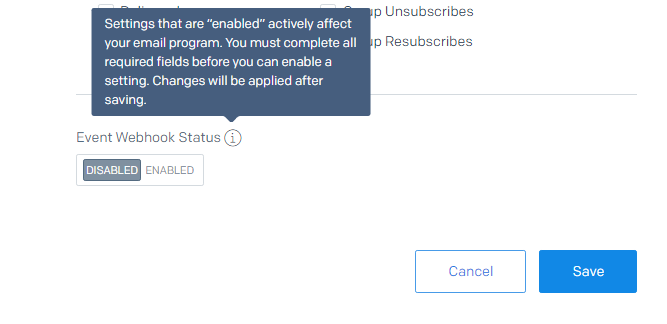
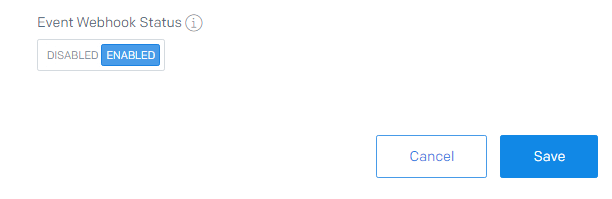
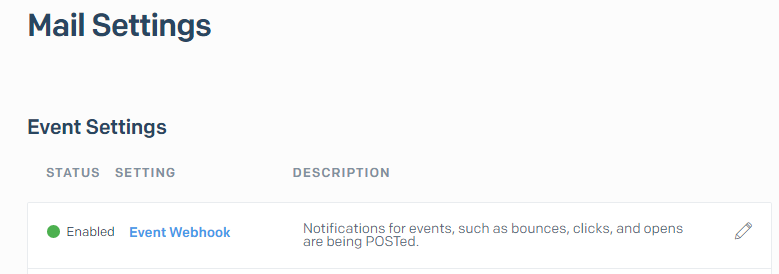
Inside your SendGrid panel open "Settings" > "Mail Settings" and proceed as in the pictures below.
For a lengthier explanation check this article.
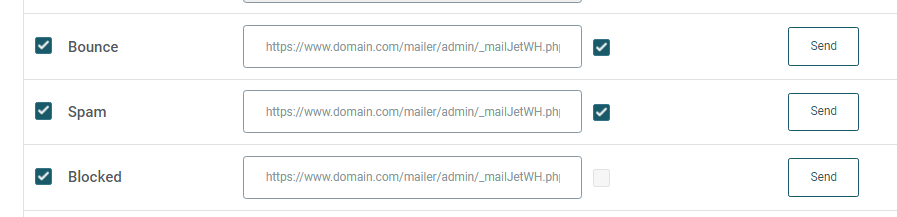
If you use MailJet smtp or api then you can set-up Webhooks in your MailJet panel and receive notifications for these events: bounce, blocked, spam.
Add this custom header to your MailJet smtp server in nuevoMailer:
Then prepare your Webhook URL. That is:
http://www.domain.com/mailer/admin/_mailJetWH.php?apiKey
Replace with your own domain, path and apiKey (from your nuevoMailer administrator accounts). Write it down.
Inside your MailJet panel open your "Account settings" where you will see:
Click on Event notifications (webhooks).
For a lengthier explanation check this article.
Enter your Webhook URL below:
Enable the webhook:
How nuevoMailer handles SendGrid notifications
- Permanent bounce
- Updates subscriber hard bounces & Mail Delivery Info fields
- Adds record into the Bounces table
- Soft / Temporary bounce
- Updates subscriber soft bounces & Mail Delivery Info fields
- Adds also a record into the Bounces table
- Complaint / Spam report
- Updates subscriber complaints & Mail Delivery Info fields
- Adds record into the Complaints table
- Delivey notificaion
- Updates campaign's delivered counter
In order to suppress subscribers having soft, hard bounces and complaints set your automatic suppression thresholds.
MailJet webhooks
New since 9.0If you use MailJet smtp or api then you can set-up Webhooks in your MailJet panel and receive notifications for these events: bounce, blocked, spam.
Add this custom header to your MailJet smtp server in nuevoMailer:
X-Mailjet-Campaign=>[camp_id];
X-MJ-CustomID=>[sub_id];Then prepare your Webhook URL. That is:
http://www.domain.com/mailer/admin/_mailJetWH.php?apiKey
Replace with your own domain, path and apiKey (from your nuevoMailer administrator accounts). Write it down.
Inside your MailJet panel open your "Account settings" where you will see:
Click on Event notifications (webhooks).
Enter your Webhook URL like you see in the picture below:
How nuevoMailer handles MailJet notifications
- Permanent/Hard bounce and Blocked
- Updates subscriber hard bounces & Mail Delivery Info fields
- Adds record into the Bounces table
- Soft / Temporary bounce
- Updates subscriber soft bounces & Mail Delivery Info fields
- Adds record into the Bounces table
- Spam / Complaint
- Updates subscriber complaints & Mail Delivery Info fields
- Adds record into the Complaints table
In order to suppress subscribers having soft, hard bounces and complaints set your automatic suppression thresholds.
Smtp.com notifications
If you use Smtp.com with the smtp method you can enable push notifications in the "Manage Senders" section of the SMTP Customer Portal.
(Changing Sender Notifications).
Add this custom header to your nuevoMailer smtp server that you setup for Smtp.com:
X-SMTPAPI=> {"unique_args": {"cmpID": "[camp_id]", "userID": "[sub_id]"}};
Then prepare your Webhook URL. That is:
http://www.domain.com/mailer/admin/_smtpComWH.php?apiKey
Replace with your own domain, path and apiKey (from your nuevoMailer administrator accounts). Write it down.
http://www.domain.com/mailer/admin/_smtpComWH.php?apiKey
Replace with your own domain, path and apiKey (from your nuevoMailer administrator accounts). Write it down.
The events (also called triggers) for which to create notifications are Delivery, Bounce, Complaint.
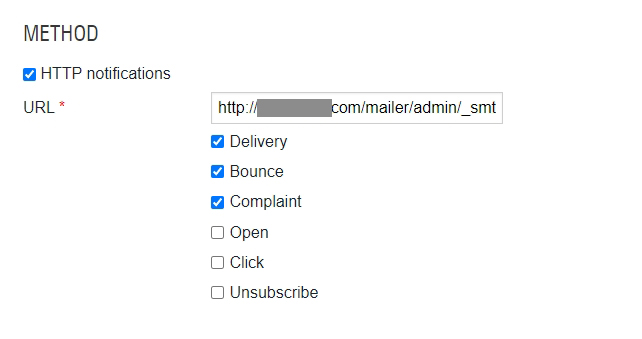
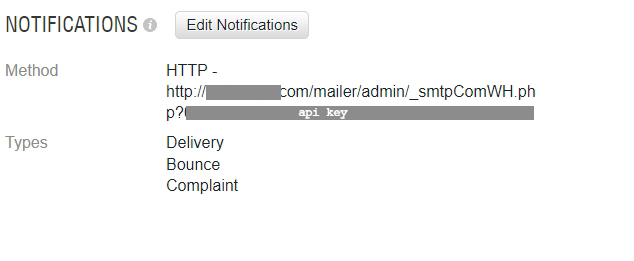
* Daily reset for smtp servers is not needed since nuevoMailer v.8.7
How nuevoMailer handles Smtp.com notifications
- Hard bounce
- Updates subscriber hard bounces & Mail Delivery Info fields
- Adds record into the Bounces table
- Soft bounce
- Updates subscriber soft bounces & Mail Delivery Info fields
- Adds also a record into the Bounces table
- Complaint / Spam complaint
- Updates subscriber complaints & Mail Delivery Info fields
- Adds record into the Complaints table
- Delivey notificaion
- Updates campaign's delivered counter
In order to suppress subscribers having soft, hard bounces and complaints set your automatic suppression thresholds.
Other major providers
Providers covered: Mailersend, Mandrill, Postmark, Brevo, smtp2Go.
Webhook endpoints & events to configure in your provider's control panel
Webhooks apply with both methods: api & smtp. In case of smtp you should also add some custom smtp headers.
Webhooks apply with both methods: api & smtp. In case of smtp you should also add some custom smtp headers.
Mailersend:
Webhook URL: http://www.domain.com/mailer/admin/_mailerSendWH.php?apiKey
Go to Domains >Manage Replace with your own domain, path and apiKey (from your nuevoMailer administrator accounts).
If using the smtp method add this custom header to the related nuevoMailer smtp server
Webhook URL: http://www.domain.com/mailer/admin/_mailerSendWH.php?apiKey
Go to Domains >Manage
Replace with your own domain, path and apiKey (from your nuevoMailer administrator accounts).
If using the smtp method add this custom header to the related nuevoMailer smtp server
X-MailerSend-Tags => "[sub_id], [camp_id], [group_id]";
Mandrill (Mailchimp):
Webhook URL: http://www.domain.com/mailer/admin/_mandrillWH.php?apiKey
Automations > Transactional emails > Launch app > Settings >Webhooks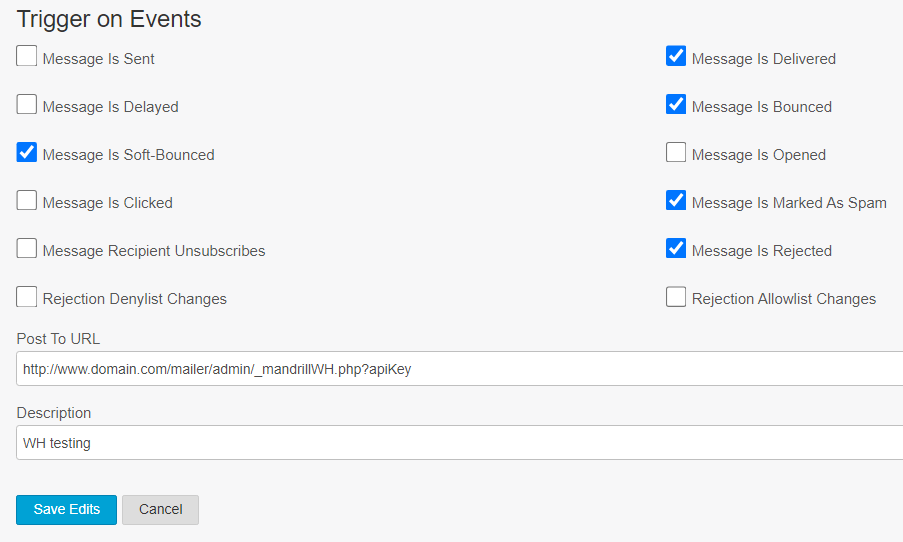 Replace with your own domain, path and apiKey (from your nuevoMailer administrator accounts).
If using the smtp method add this custom header to the related nuevoMailer smtp server
Webhook URL: http://www.domain.com/mailer/admin/_mandrillWH.php?apiKey
Automations > Transactional emails > Launch app > Settings >Webhooks
Replace with your own domain, path and apiKey (from your nuevoMailer administrator accounts).
If using the smtp method add this custom header to the related nuevoMailer smtp server
X-MC-Metadata=> { "recipient_id": "[sub_id]", "campaign_id": "[camp_id]", "group_id": "[group_id]"};
Postmark:
Webhook URL: http://www.domain.com/mailer/admin/_postMarkWH.php?apiKey
Go to the server you have, click "Default Transactional Stream" then click Webhooks.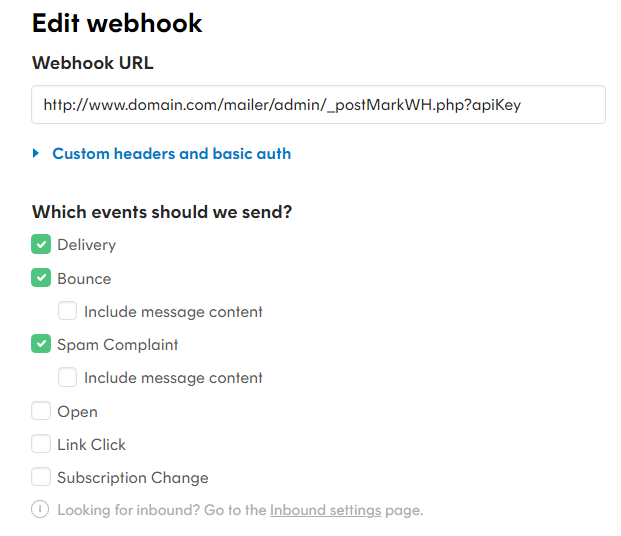 Replace with your own domain, path and apiKey (from your nuevoMailer administrator accounts).
If using the smtp method add this custom header to the related nuevoMailer smtp server
Webhook URL: http://www.domain.com/mailer/admin/_postMarkWH.php?apiKey
Go to the server you have, click "Default Transactional Stream" then click Webhooks.
Replace with your own domain, path and apiKey (from your nuevoMailer administrator accounts).
If using the smtp method add this custom header to the related nuevoMailer smtp server
X-PM-Metadata-recipient_id=>[sub_id];
X-PM-Metadata-campaign_id=>[camp_id];
X-PM-Metadata-group_id=>[group_id];
X-PM-Message-Stream=> outbound;
Brevo (Sendinblue):
Webhook URL: http://www.domain.com/mailer/admin/_brevoWH.php?apiKey
Click Transactional, Settings, Webhook.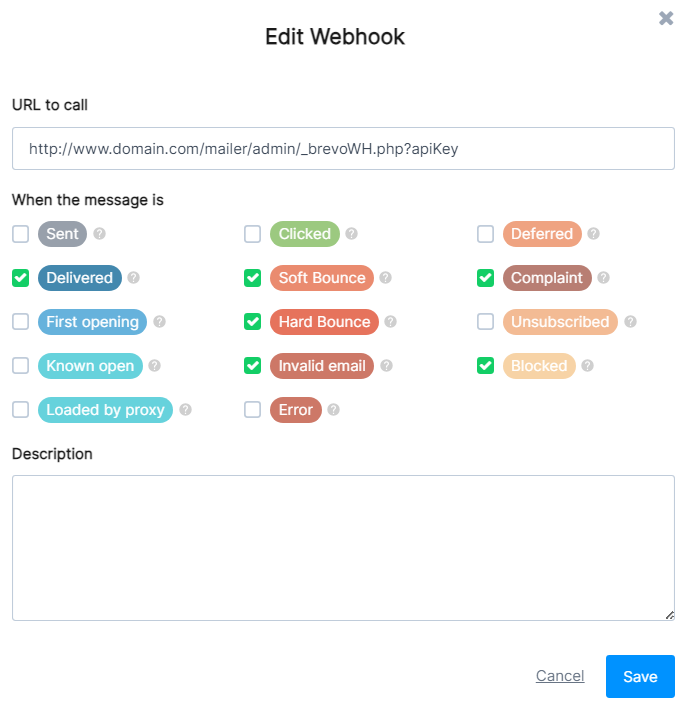 Replace with your own domain, path and apiKey (from your nuevoMailer administrator accounts).
If using the smtp method add this custom header to the related nuevoMailer smtp server
Webhook URL: http://www.domain.com/mailer/admin/_brevoWH.php?apiKey
Click Transactional, Settings, Webhook.
Replace with your own domain, path and apiKey (from your nuevoMailer administrator accounts).
If using the smtp method add this custom header to the related nuevoMailer smtp server
X-Mailin-custom => {"recipient_id":"[sub_id]", "campaign_id":"[camp_id]", "group_id":"[group_id]"};
smtp2Go:
Webhook URL: http://www.domain.com/mailer/admin/_smtp2GoWH.php?apiKey
Replace with your own domain, path and apiKey (from your nuevoMailer administrator accounts).
In the smtp server you created in nuevoMailer add these custom headers:
In your smtp2Go panel go to Settings > Webhooks and add a new Webhook.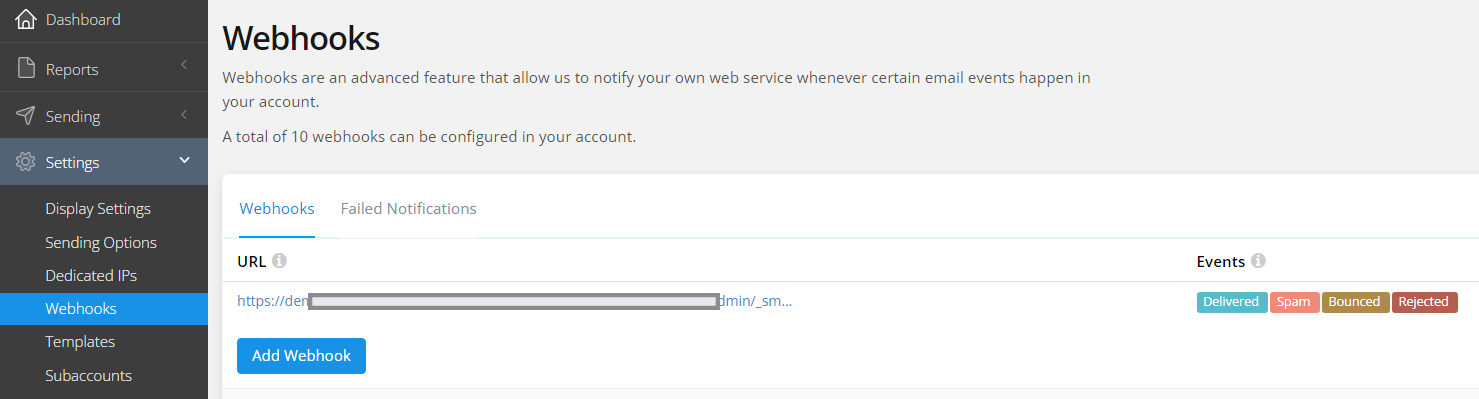
Create/edit your webhook as you see here. Check the related checkboxes and also add the following values in the Headers box: campaign_id, recipient_id, group_id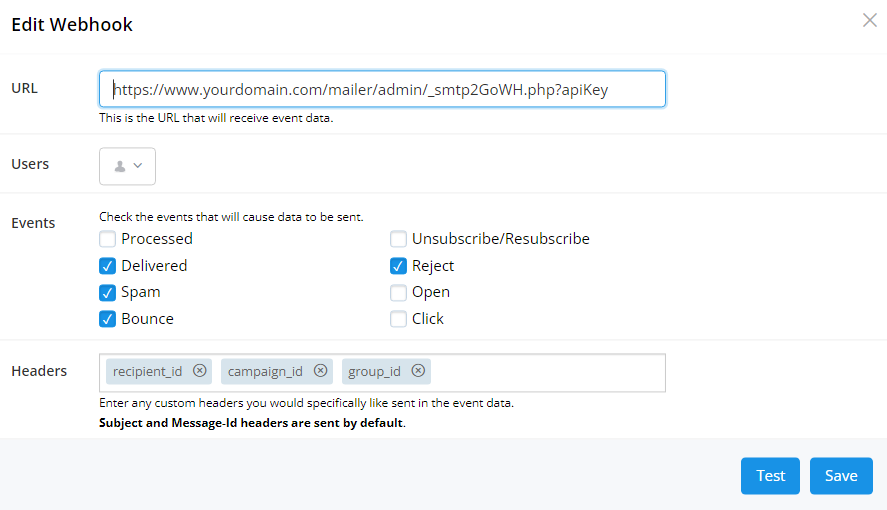
Webhook URL: http://www.domain.com/mailer/admin/_smtp2GoWH.php?apiKey
Replace with your own domain, path and apiKey (from your nuevoMailer administrator accounts).
In the smtp server you created in nuevoMailer add these custom headers:
recipient_id => [sub_id];
campaign_id => [camp_id];
group_id => [group_id];
In your smtp2Go panel go to Settings > Webhooks and add a new Webhook.
Create/edit your webhook as you see here. Check the related checkboxes and also add the following values in the Headers box: campaign_id, recipient_id, group_id
Sending domains & DKIM
Sending domains should be added when you want to use DKIM signing. They do not serve any other purpose.
How does it work?
Whenever an email is sent the domain part of the <From-email> is checked within your defined sending domains.
If the domain exists and DKIM is enabled the mailer will DKIM-sign the email.
Whenever an email is sent the domain part of the <From-email> is checked within your defined sending domains.
If the domain exists and DKIM is enabled the mailer will DKIM-sign the email.
DKIM signing
- This is optional and should be used with caution.
- Nowadays, all major SMTP/API email relay services sign the emails they send. So you can use DKIM-signing only in cases your provider does not.
- Double-dkim-signing should be avoided cause it may lead to an unfavorable email spam-score evaluation.
- So first examine your email headers and in case they are not dkim-signed and your provider does not offer this service you can use the built-in dkim signer.
How to use
-
Go Menu > Tools > Sending domains.
Add the domain you want and click on
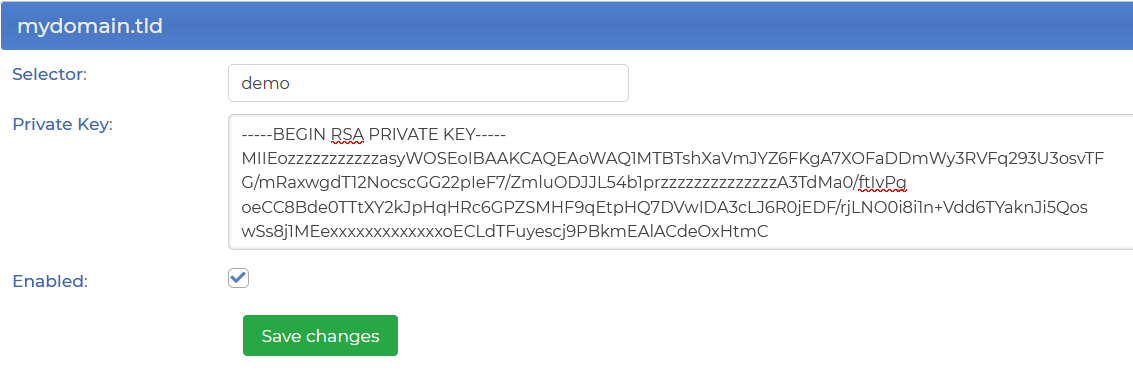
- Selector: use a simple short phrase.
- Private Key: to create your private key you can use a DKIM record generator such as Easydmarc but you may also do it programmatically.
- The generator will return your private key and a TXT record (a pair of name-value) to add at your domain's DNS settings. This is usually called DNS zone editor in your control panel.
- Example: we use "demotemp" as selector for "mydomain.net".
The TXT's record name will look something like this: demotemp._domainkey.mydomain.net
When you add it in your control panel this last part may be removed: .mydomain.net
The record's value will look like this:
v=DKIM1;t=s;p=MIIBIjANBgkqhkiG9w0BAQEFAAOCAQ8AMIIBCgKCAQEA/zeHdVe13wvlZiio9fhbQHVB3M9gGbwFSxTS1Cp5MG........ - A TTL of 1800 to 3600 is recommended for TXT (SPF)/DMARC/DKIM/CAA records. Source.
Feedback loop / Complaints
Menu > Tools > Feedback loop settings
- In order to use this feature you must register with major ISPs in order to receive notifications by email about subscriber complaints.
- Create an email account specifically for this purpose. ISPs will send you email notifications to this email account.
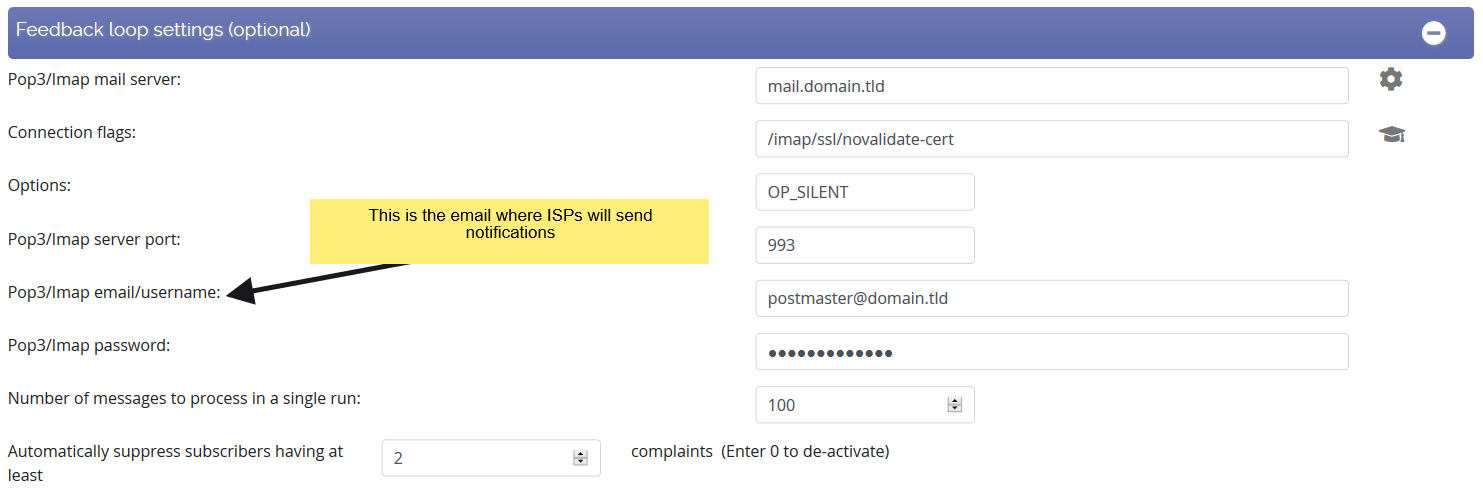
- You will also need to add this cron job so you can process the mailbox:
http://www.domain.com/mailer/admin/_fbl.php?apiKey
Replace with your own domain, path and apiKey. Have the cron job run several times per hour and keep the "Number of messages to process in a single run" below 100. - There is no definite standard as to what content exactly each ISP will send you back. If possible you should ask to receive the original email you sent (attached) or its headers.
- nuevoMailer will scan the email and try to extract subscriber and campaign information. Do not download the emails from the server. Or if you do, leave a copy there. nuevoMailer will delete them after processing.
- This is what nuevoMailer will do with these emails:
- Update campaign complaints+1
- Remove subscriber from all lists in this campaign
- Insert subscriber into opt-outs for all lists in this campaign
- Update subscribers complaints+1 & mailDeliveryInfo='FBL complaint'
- If the complaints threshold for this subscriber is reached:
- suppress subscriber
- remove from all lists
- insert into opt-outs as a global opt-out and reason 'FBL complaint'.
"List-Unsubscribe" header & Opt-out by email
Menu > Tools > List-Unsubscribe header
- The "List-Unsubscribe" header is optional but good-to-have. Not all ESPs/ISPs support it but the major ones do and therefore it is good to have one.
- This header may append an email address where one can reply to opt-out and/or a direct opt-out link. The ESP decides what to use.
- This is not a substitute method for unsubscribing. It should not be considered as a replacement to your normal opt-out links that you must have in your newsletters.
- If the email provider displays the opt-out link and the subscriber clicks it then it will function exactly as the opt-out link either as global or list opt-out.
- If it shows an email address then the provider will send an email to this address. Therefore you must "process" this mailbox like you do with bounce manager. You must set-up cron job #9 to process these emails as explained here.
Opt-out by email
Using the above logic and the same process a subscriber can opt-out by sending an email to
your "List-Unsubscribe" email account with the word STOP in the subject. Like this: Example.
mailto:list-un-sub@mydomain.com?subject=STOP- You can use the opt-out by email feature without using the "List-Unsubscribe" header.
- But you must set-up the "List-Unsubscribe" mailbox and the cron job so that you can process these unsubscribe emails.
- Using opt-out links in your newsletters is always the best and most direct method.
But there are cases that you send emails or newsletters outside nuevoMailer. In these cases the opt-out by email is a great trick to use.
Check your opt-outs report
When a subscriber opts-out by email or by using the "List-unsubscribe" header you will see the following:
- List-Unsubscribe-Header means the link in the "List-unsubscribe" header was used.
- List-Unsubscribe-Header by email means the email method in the "List-unsubscribe" header was used.
- Opt-out by email means the subscriber sent you a simple opt-out email.
Cron jobs
There is no need to add all of the cron jobs that you see below. Most of them refer to special features which if you don't use then you don't need their cron jobs.
Jobs 2 & 5 are the most important ones that most users will probably need.
Attention: do not add both 1 & [2 & 3].
Add only job 1 or 2 & 3 (in case you have heavy loads of campaigns and autoresponders and need to use different timing for each).
Jobs 2 & 5 are the most important ones that most users will probably need.
Attention: do not add both 1 & [2 & 3].
Add only job 1 or 2 & 3 (in case you have heavy loads of campaigns and autoresponders and need to use different timing for each).
| 1. For both campaigns and auto-responders (v.4 + later) |
| curl -l -s http://www.domain.com/mailer/admin/_start.php?apiKey |
| 2. For campaigns only (v.6 + later) |
| curl -l -s http://www.domain.com/mailer/admin/_start.php?apiKey_c |
| 3. For auto-responders only (v.6 + later) |
| curl -l -s http://www.domain.com/mailer/admin/_start.php?apiKey_r |
| 4. Trigger & transactional emails (v.5 + later) |
| curl -l -s http://www.domain.com/mailer/admin/_sendTr.php?apiKey |
| 5. Bounces processing (v.4 + later) |
| curl -l -s http://www.domain.com/mailer/admin/_bmProcessCron.php?apiKey |
| 6. Single data source synchronization (v.4/5/6.x) |
| curl -l -s http://www.domain.com/mailer/admin/dataSourceSync.php?apiKey_X |
| 7. All data sources synchronization (v.7 + later) |
| curl -l -s http://www.domain.com/mailer/admin/_sync.php?apiKey |
| 8. Birthday reminder (v.4 + later) |
| curl -l -s http://www.domain.com/mailer/admin/birthdayReminder.php?apiKey |
| 9. List-Unsubscribe (v.4 + later) |
| curl -l -s http://www.domain.com/mailer/admin/_listUnsubProcess.php?apiKey |
| 10. Resets the daily maximum limit in all campaigns (& smtp servers). Removes entries from 3 other tables for stricter GDPR compliance (see inc/classUtil.php). (v.6 + later) * |
| curl -l -s http://www.domain.com/mailer/admin/_reset.php?apiKey |
| 11. Subscribe by email: read & process mailboxes (v.6 + later) |
| curl -l -s http://www.domain.com/mailer/admin/_optInByEmail.php?apiKey |
| 12. Feedback loop (v.8 + later) |
| curl -l -s http://www.domain.com/mailer/admin/_fbl.php?apiKey |
| 13. Weekly summary reports by email (v.9 + later) | curl -l -s http://www.domain.com/mailer/admin/weeklyReport.php?apiKey |
- Replace www.domain.com/mailer with your own installation URL.
- Instead of curl -L -s you may use WGET -O /dev/null.
- Replace apiKey with your own.
You will find your api key in your administrator accounts page:
Menu > Tools > Administrator accounts - For v.4/5/6.x, when syncing a data source X is the ID of the data source you want to sync.
You can see this ID in the drop-down menu where you select a data source (external database connection). - Need help with timing syntax?
You can refer here http://en.wikipedia.org/wiki/Crontab for details.
You may also use this free service to create your cron command https://crontab-generator.org/. - Attention: your api key is derived from your administrator email and encryption password.
If you change any of these two then you must copy the new api key and update your cron jobs.
- For campaigns you will probably have the cron hit every 5 minutes or even less depending on your needs:
*/5 * * * * curl -l -s http://www.domain.com/mailer/admin/_start.php?apiKey_c - For auto-responders have the cron hit exactly every 5 minutes:
*/5 * * * * curl -l -s http://www.domain.com/mailer/admin/_start.php?apiKey_r - In case you use one cron job for both auto-responders and campaigns have the cron hit exactly every 5 minutes:
*/5 * * * * curl -l -s http://www.domain.com/mailer/admin/_start.php?apiKey - For triggered emails a 5 minute period is fine. The frequency should depend on:
- The expected volume of your triggers. If for example you put a trigger on "Campaign view" and you have thousands of views then job #4 should run very often (every 2 minutes).
- This script processes the emails in batches. And it uses your general batch size defined at your settings page. if needed, you can hardcode the batch size to a number that suits you better.
- However, since the purpose of trigger emails is to target subscribers on an individual and timely basis perhaps it is better to re-evaluate your trigger strategy and instead use a follow-up campaign.
- The birthday reminder should run at least once a day.
- Data source synchronization should be done before a campaign or have it run regularly one or more times per day.
- The bounce manager should run periodically, even several times per hour and especially before and after a campaign so that your lists are kept clean.
- Feedback loop: more here.
Are my cron jobs running?
Check your activity log to confirm that your cron jobs are set correctly and running.
Menu > Campaigns > Activity log
You should see lines there like Cron hit and similar.
Menu > Campaigns > Activity log
You should see lines there like Cron hit and similar.
Localization for non-English speaking users
- All users are strongly recommended to use utf8 character encoding which is a safe choice for all
languages.
The script you used to create your tables defines also the Global character set you must use in your configuration settings.
So use an equivalent encoding: both in utf8 or latin1 with iso-8859-1/3. - Always define the character set at the newsletter level (with the same logic as above).

- It is a good idea to define the character set for the landing pages & greeting emails (welcome, goodbye etc) by adding such a line in the
html code:
<meta http-equiv="Content-Type" content="text/html; charset=utf-8">

<meta http-equiv="Content-Type" content="text/html; charset=iso-8858-1">
Translation
You can translate the administration panel into your own language. You will find the language files in the directory /admin/includes/lang/.
In addition, adding your own language involves editing the following files:
To translate the subscriber pages open the file inc/languages.php where you see lines such as:
Feel free to exchange your translated language files by sending us a copy of your translation.
You can translate the administration panel into your own language. You will find the language files in the directory /admin/includes/lang/.
In addition, adding your own language involves editing the following files:
- /admin/includes/languages.php
- /admin/index.php
To translate the subscriber pages open the file inc/languages.php where you see lines such as:
define("SUBACCOUNT_1", "Your Newsletter subscriptions");Feel free to exchange your translated language files by sending us a copy of your translation.