Newsletters
General
Technically, a newsletter is html code just like a web page.
A key difference is that we must use some different coding and formatting techniques because email clients tend to be restrictive and selective in how they render the same html content.
A key difference is that we must use some different coding and formatting techniques because email clients tend to be restrictive and selective in how they render the same html content.
With nuevoMailer you can use your newsletters for the following purposes:
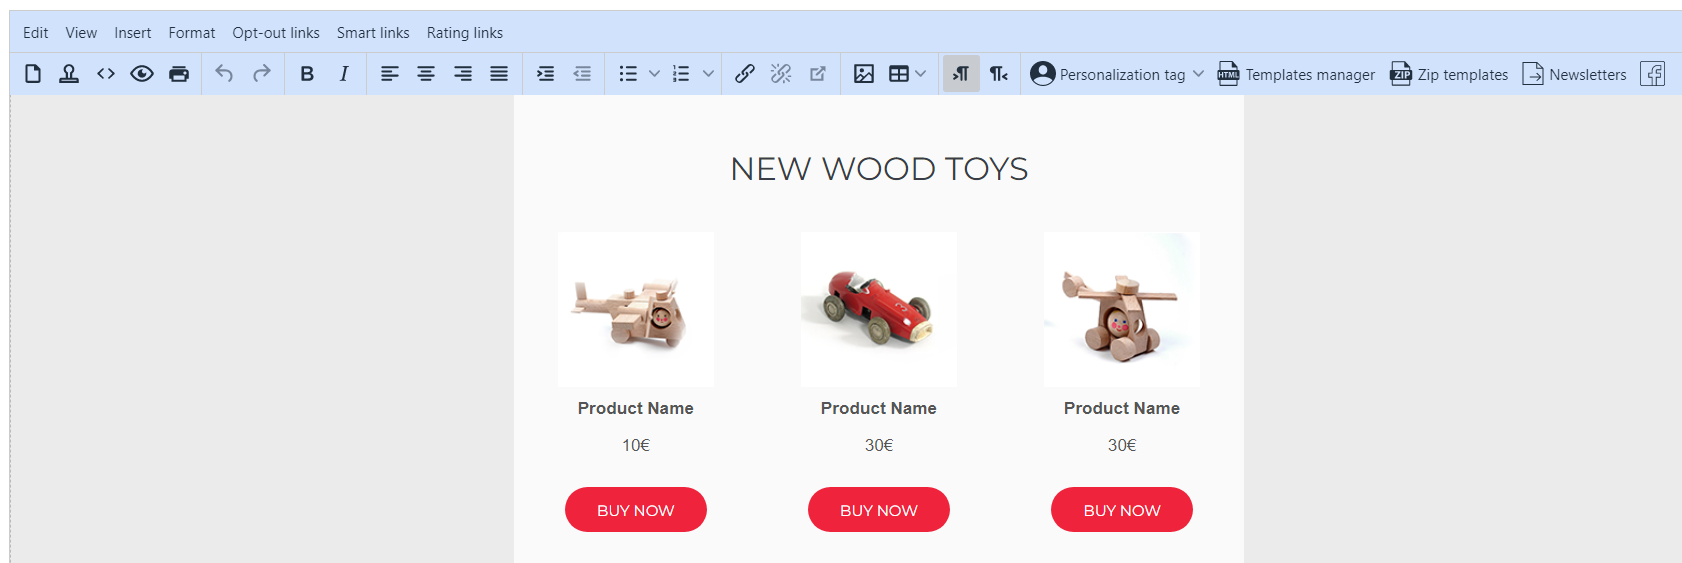
 You can create newsletters just for displaying your content. And you can link from one newsletter to another.
- In your email campaigns & autoresponders (this is their primary use).
- As greeting emails (welcome, goodbye) after opt-in/-out or confirmation. More
- As transactional emails, triggered by subscribers actions or with api integrations.
- As landing pages (welcome, goodbye) after an opt-in/-out or confirmation. More
- As general content pages to which you can link from other newsletters. More
You can create newsletters just for displaying your content. And you can link from one newsletter to another.
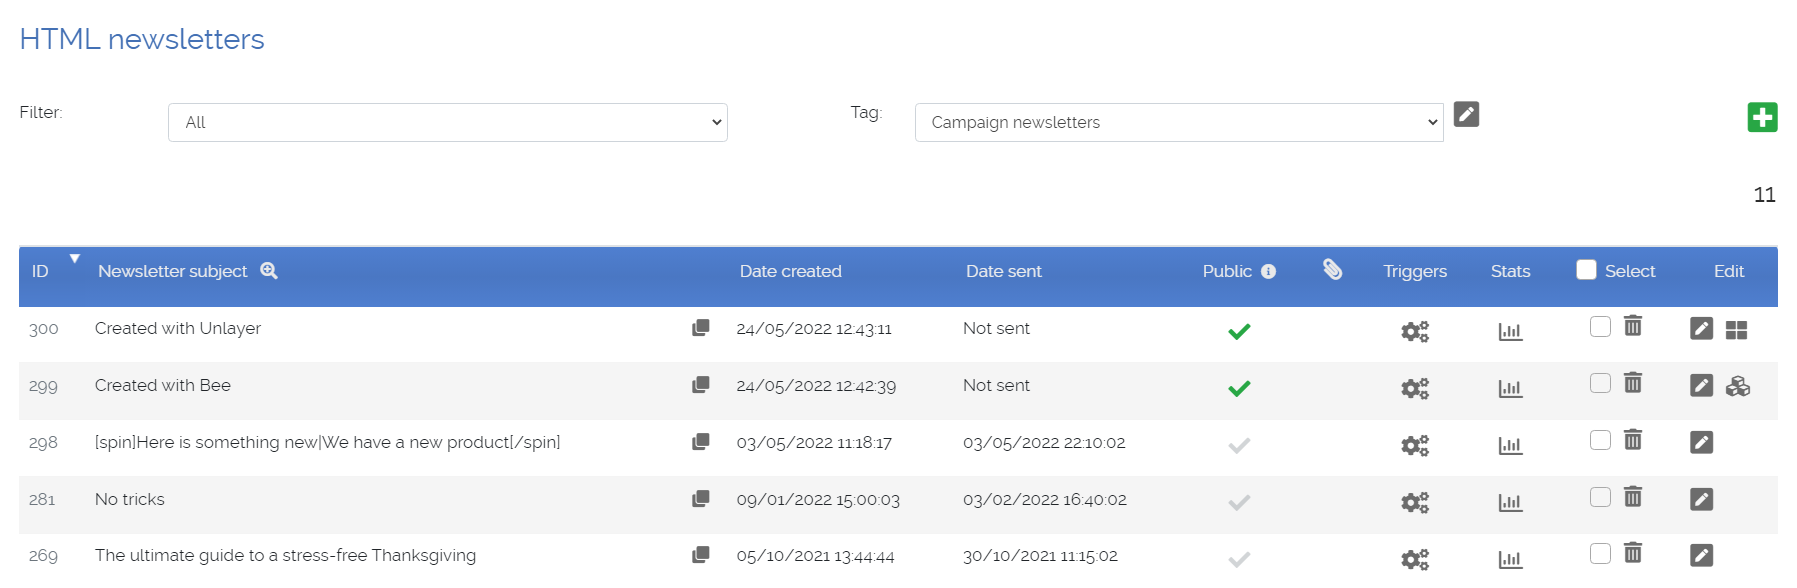
Public and hidden newsletters
- Click on the icon to change between public/hidden.
- A public newsletter appears in the newsletter archive.
- If you use the smart link "Read this newsletter in your browser" then the newsletter will show normally even if it is hidden. This is new in v.9.6.
Editing
Depending on the editor you used to create the newsletter you will see different icons.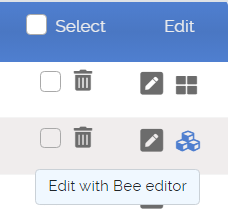
Default WYSIWYG editor
Unlayer drag n drop editor
Bee drag n drop editor
 Stripo drag n drop editor
Unlayer drag n drop editor
Bee drag n drop editor
Stripo drag n drop editor
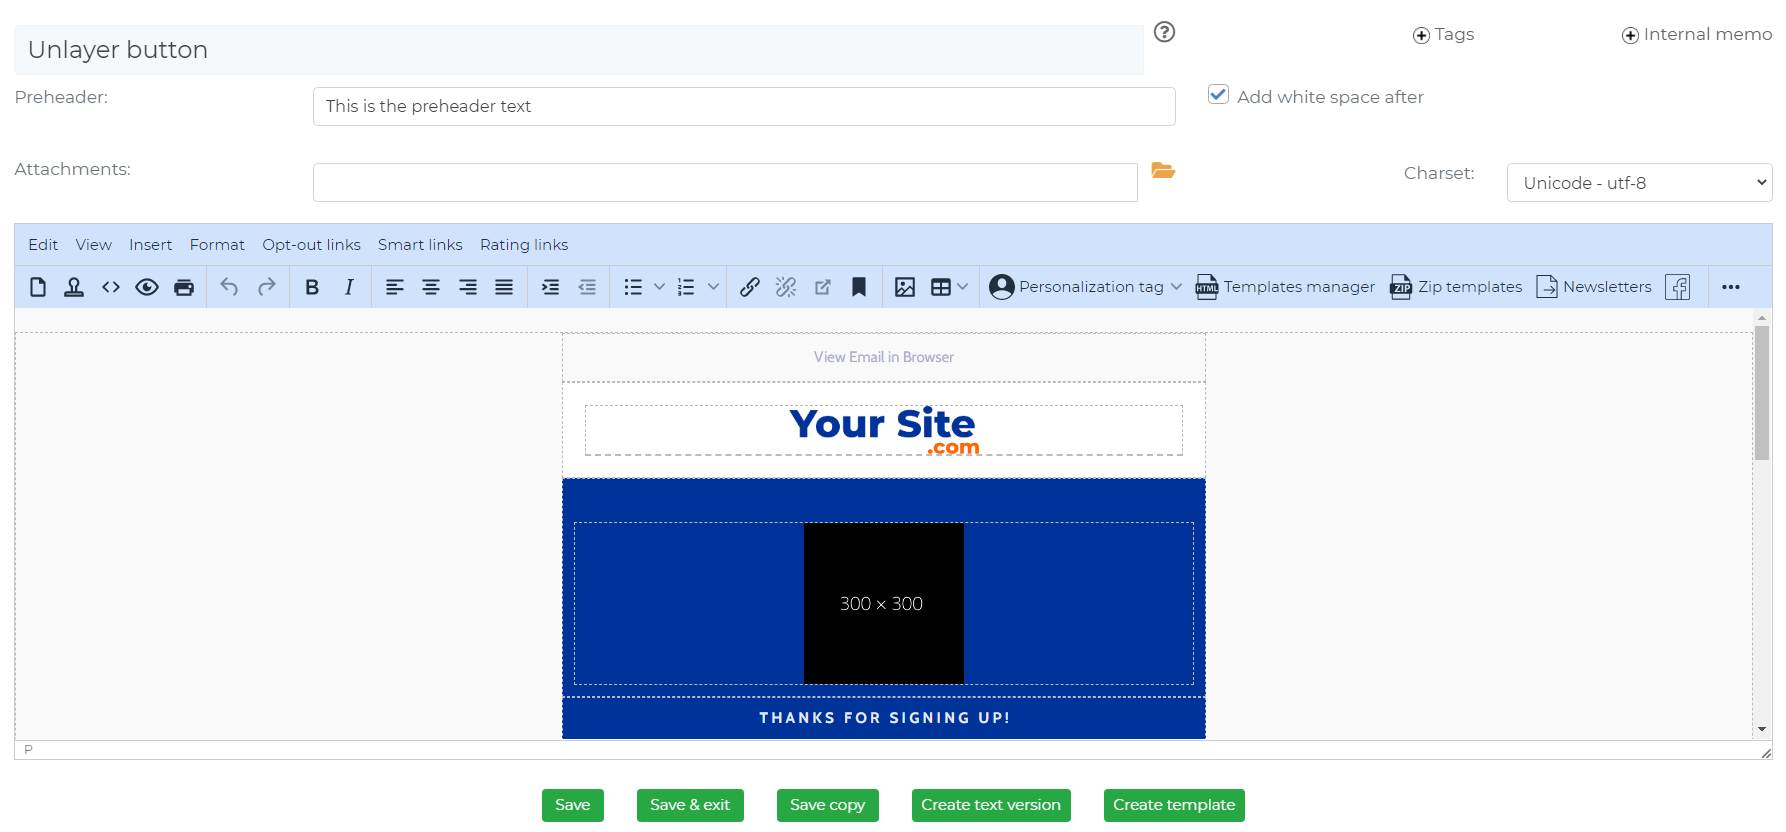
Save : the newsletter is saved with the changes you made. You stay on the same page. And you hear a sound alerting you that it was saved.
Save & exit : the newsletter is saved with the changes you made and you are redirected to your newsletters listing page.
Save copy : a copy of the newsletter will be saved. It creates a clone. The original is still there. You can use this feature as template generator. You keep a master newsletter as the template. Each time you want to create a new one, open the template and click on “Save copy”.
Create text version: a text version of this newsletter will be created and saved. The original html newsletter is still there.
Create template will create an html file and save it in your assets folder. You can access, preview and load this file using the “Templates manager”.
Send : you can send a test email. The name and email of the administrator who is currently logged in are pre-filled.
Automatic saving: when you keep editing your newsletter your changes are saved automatically every 3 minutes. You will hear it. But you can turn the sound alert off in your general configuration settings.
Personalization
With nuevoMailer you can extensively personalize your newsletters: the body, the subject line, the Preheader and the hyperlinks.
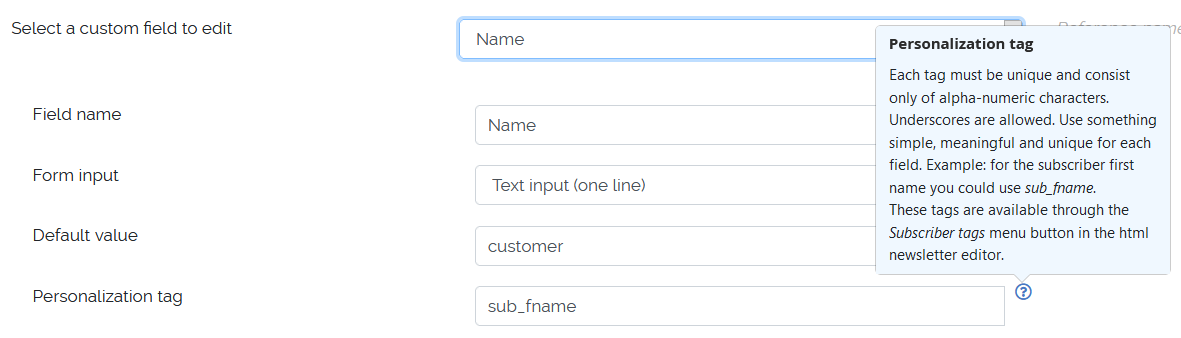
Personalization starts by defining a Personalization tag when setting-up your custom subscriber fields.
In HTML newsletters use the "Subscriber/Tags" button of the HTML editor. The [brackets] are added automatically.
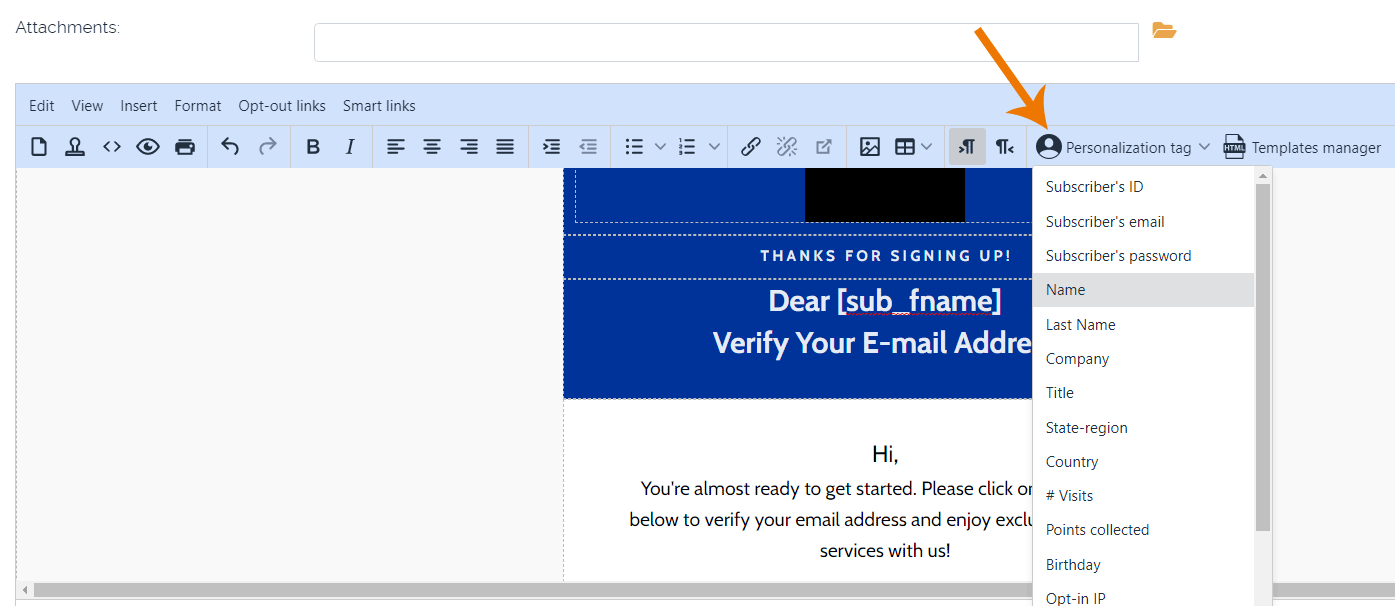
In HTML newsletters use the "Subscriber/Tags" button of the HTML editor. The [brackets] are added automatically.
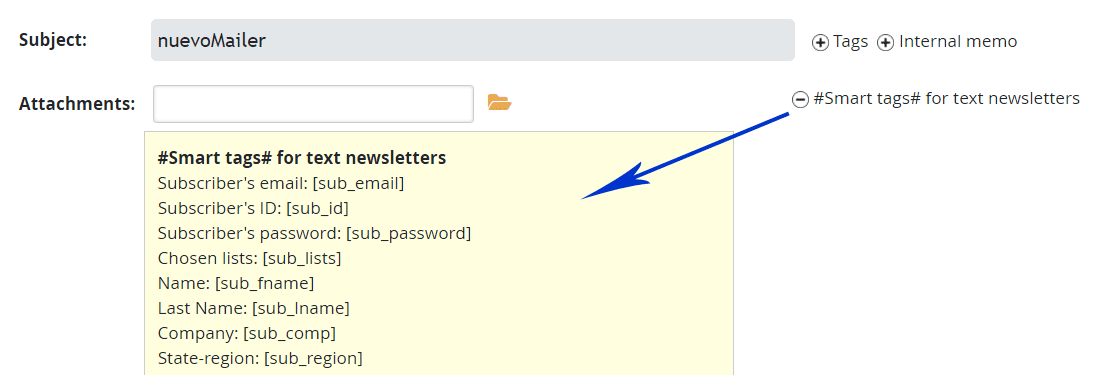
In Text newsletters you must manually type these tags. You will find a complete list of all
available tags in the editing page.
To personalize the email subject and the preheader you can use the same tags that you use in the newsletter body.
Personalizing hyperlinks is done in a similar manner. Example:
The [sub_email] & [sub_fname] are your normal subscriber personalization tags.
So when the subscriber clicks this hyperlink he will land at your page with this url:
Of course, you can use any subscriber field that you want.
Personalizing hyperlinks is particular useful in lead generation.
http://www.domain.com/?email=[sub_email]&name=[sub_fname]The [sub_email] & [sub_fname] are your normal subscriber personalization tags.
So when the subscriber clicks this hyperlink he will land at your page with this url:
http://www.domain.com/?email=me@myemail.com&name=JasonOf course, you can use any subscriber field that you want.
Personalizing hyperlinks is particular useful in lead generation.
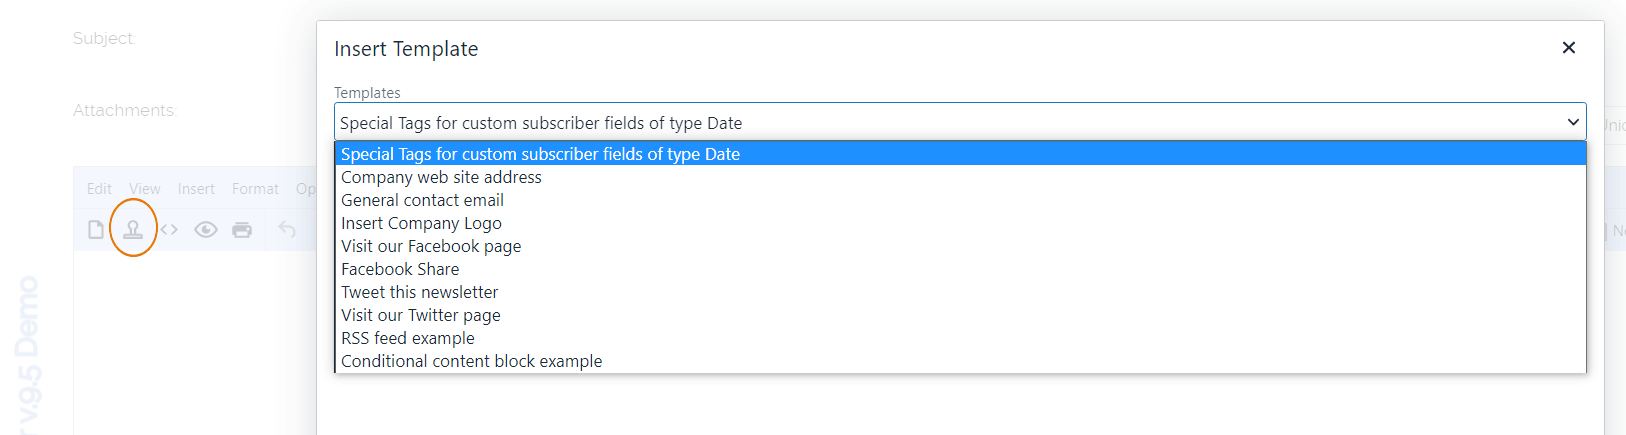
Special tags for custom subscriber fields of type date (new in v.9.5)
Assume you have a custom subscriber field (of type date) defined as Birthday and [birth_day] is the personalization tag you set.
Here is how to add or subtract days, months, weeks or years to the actual birthday,
You can also apply these tags to these dates: [sub_date_subscribed], [sub_date_emailed], [sub_date_updated]
And you can also use these tags in subject lines.
Here is how to add or subtract days, months, weeks or years to the actual birthday,
[birth_day] //will write the actual birthday
D%[birth_day]+1m%D  //adds 1 month to the birthday date
D%[birth_day]+2w%D  //adds 2 weeks to the birthday date
D%[birth_day]+-2w%D  //subtracts 2 weeks from the birthday date. Note the use of +-.
D%[birth_day]+-2d%D  //subtracts 2 days from the birthday date. Note the use of +-.
You can also apply these tags to these dates: [sub_date_subscribed], [sub_date_emailed], [sub_date_updated]
And you can also use these tags in subject lines.
Attention: These replacements will not work with the following date-time formats that you define in your configuration settings:
-19/08/2022 11:44 am
-19/08/2022 11:44:28
-2022.08.19 11:44:28
-19/08/2022 11:44 am
-19/08/2022 11:44:28
-2022.08.19 11:44:28
Un-subscribe links (opt-out)
For HTML newsletters
When you edit an HTML newsletter click on this editor button
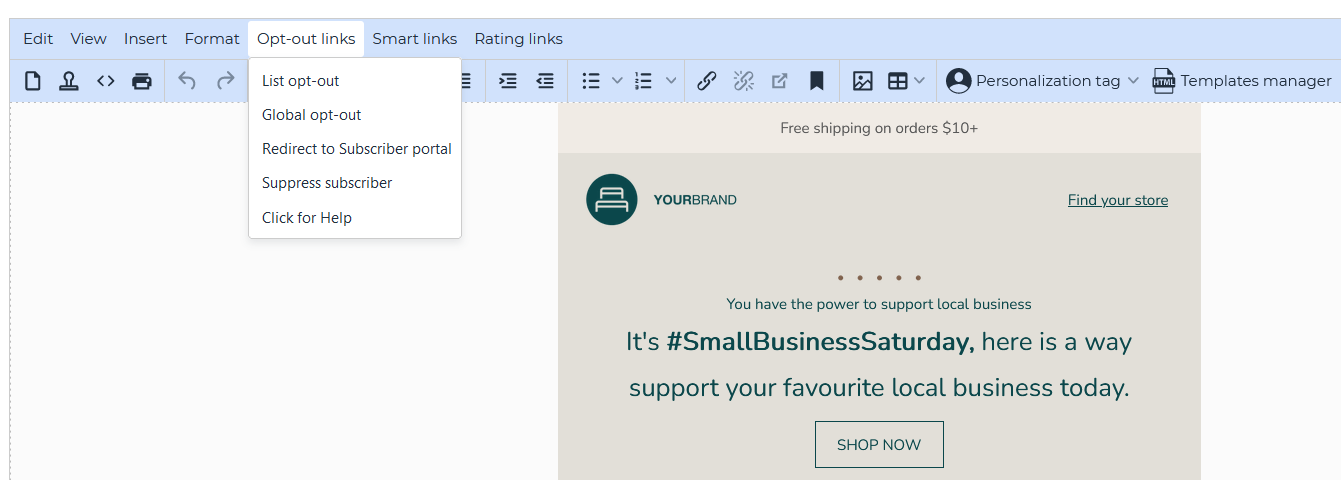
When you edit an HTML newsletter click on this editor button
Select any word, phrase or image and choose the required action using the menu in the pop-up window.
Available actions
- Global opt-out: the subscriber will be directly deleted from all the lists he is subscribed and from the subscribers table. In other words, he is permanently deleted. He is also added in the opt-outs table.
- List opt-out: the subscriber will be deleted
only from the specific list(s) where he belongs and the newsletter was sent to. He is not deleted from
the subscribers table and he keeps the rest of his subscriptions (in other lists), if he has any.
He is also added in the opt-outs table for each and every list.
Attention: When you use a list opt-out in a newsletter/campaign that was sent to all subscribers or all lists then it works as a global opt-out and results in a permanent deletion. - Suppress subscriber:
the subscriber is suppressed but he is not removed from the system. The action is recorded in your opt-outs report.
Suppressing a subscriber means that he will never be emailed again.
Furthermore, contrary to a global opt-out all subscriber statistics and list assignments are kept. This may be handy for legal reasons.
- Redirect to Subscriber portal: this link will directly log-in the subscriber into a password protected page where he can see all available lists, cancel and/or start new subscriptions and update his profile.
For Text newsletters
- List opt-out: simply type [list_optout]
- Global opt-out: type [global_optout]
- Suppression link: type [suppress_link]
- Subscriber portal: [account_login]
- The links will be automatically formatted and personalized for each subscriber during the sending.
Good to know:
- When you use a list opt-out in a newsletter/campaign that was sent to all subscribers or all lists then it works as a global opt-out and results in a permanent deletion.
- The “Goodbye” pages and emails are fully customizable and the “Goodbye” email can be switched off. More.
- Opt-out links have effect only in campaigns. They do not work when sending a single test newsletter. But the test will show if your link is formatted correctly.
- You can have all three types of opt-out links in the same newsletter. We suggest trying all alternatives and find the one that fits better with your business model.
- The files that process the opt-out links are located in the folder “subscriber”. Therefore this folder should not be password-protected or access-restricted.
All opt-outs are recorded and you can see them under Menu > Reports > View opt-outs and reasons
Attachments
Click on next to the attachments input field and a new window will open.
This window is an online file manager that actually shows the attachments you have uploaded and are inside your attachments folder.
Click the checkbox in front of the file you want to attach and the file name is automatically entered in the input area.
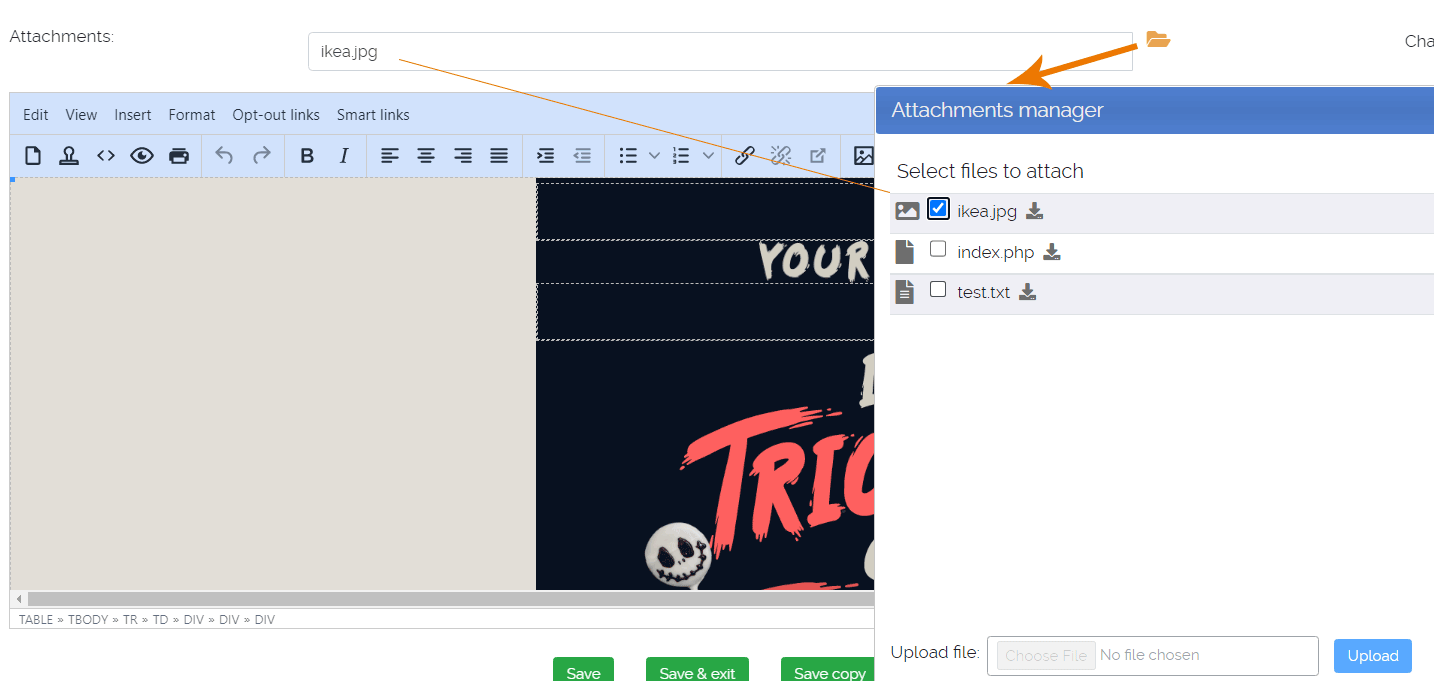
You can send many attachments with a newsletter. Separate them with a comma (,). No spaces required. The attached files must be in the attachments folder.
All files are supported and can be send as attachments. Docs, PDFs, images etc...
To be safe, it is better to avoid spaces/blanks in the names of the attached files. Example: the name of the file must be <NewFeatures.doc> or <New_Features.doc> or <New-Features.doc> instead of <New Features.doc>.
All files are supported and can be send as attachments. Docs, PDFs, images etc...
To be safe, it is better to avoid spaces/blanks in the names of the attached files. Example: the name of the file must be <NewFeatures.doc> or <New_Features.doc> or <New-Features.doc> instead of <New Features.doc>.
Note: too many and too large attachments decrease sending speed. Sometimes it is better to upload the attachments at your server and provide direct download links inside the newsletter (which in addition are tracked).
Images
In HTML newsletters you can have images/pictures in your newsletter body.
The HTML editor of nuevoMailer has an integrated utility to upload and add images in your newsletters. By default images are uploaded into the assets folder.
Click on this button to open it:
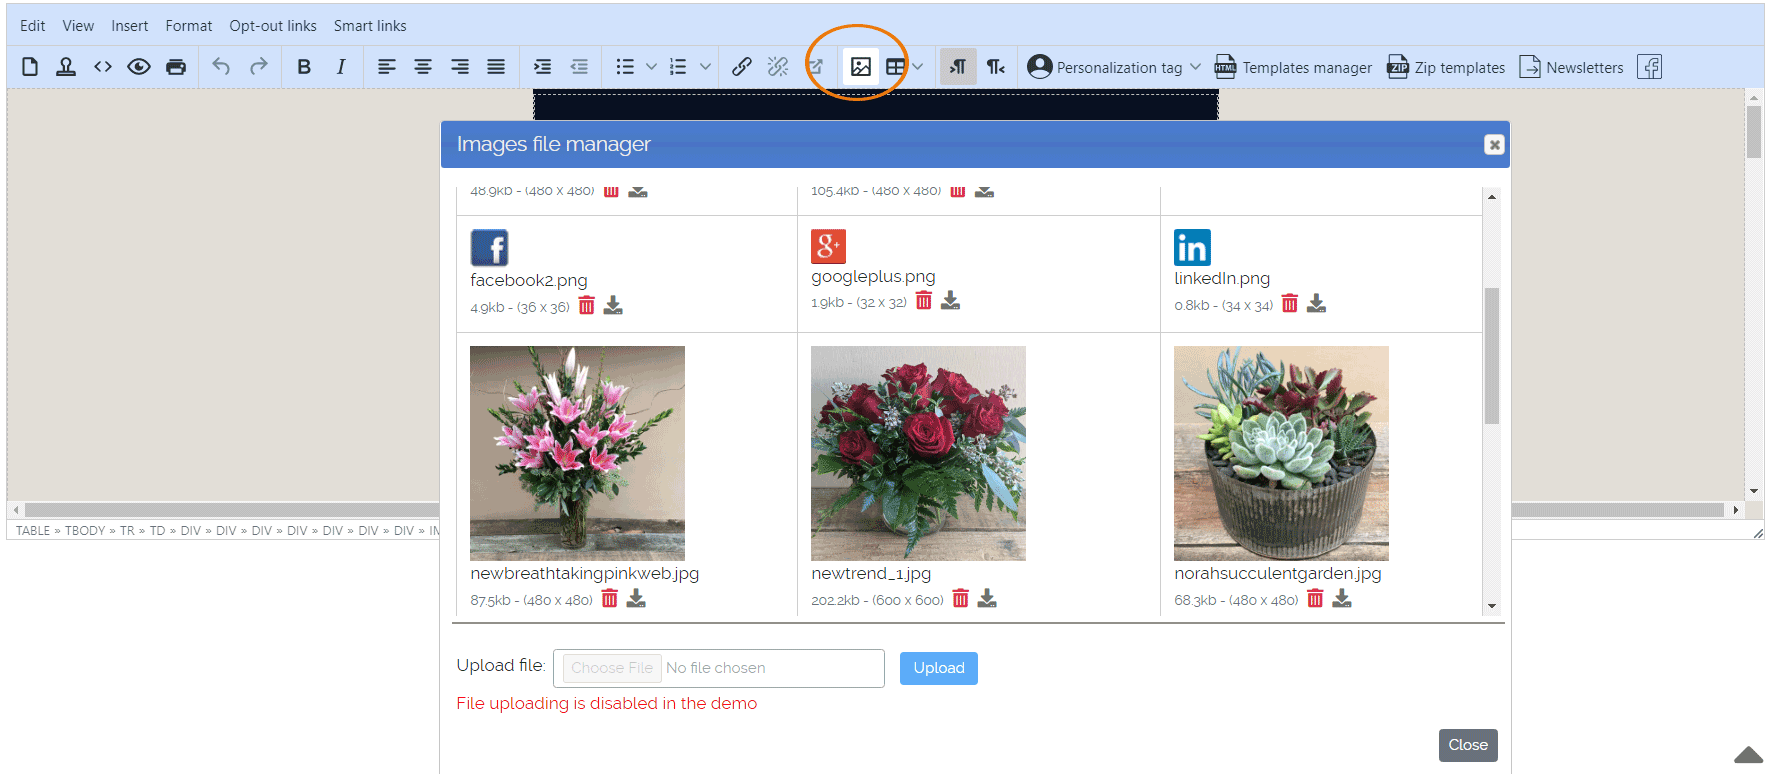 You can use the “Images file manager” to upload images to your web server and insert them in your newsletter.
The HTML editor of nuevoMailer has an integrated utility to upload and add images in your newsletters. By default images are uploaded into the assets folder.
Click on this button to open it:
You can use the “Images file manager” to upload images to your web server and insert them in your newsletter.
- Images must be physically located on a web server.Not necessarily the server where nuevoMailer is installed.
- The image source url must be absolute (http://domain.com/images/image.gif) and not relative (./images/image.gif).
-
Problem uploading?
- The assets folder must have "write permissions" or chmod755 (in rare cases chmod777 may be required).
- The image size must be under the maximum allowed as defined in this php.ini directive: upload_max_filesize
- Try uploading a small image. If that works then permissions are correctly set.
- If you still cannot upload a larger image then increase upload_max_filesize in php.ini or in your Host's control panel.
- If you still have a problem check your PHP error log file for hints.
Inline / Embedded images
For security reasons modern email clients block images from displaying in a newsletter unless the recipient (subscriber) has
already defined the sender as verified/trusted or has explicitly allowed automatic image downloading.
nuevoMailer gives you the option to send your images as inline (or embedded). In this way you increase the chances of having your images showing automatically.
nuevoMailer gives you the option to send your images as inline (or embedded). In this way you increase the chances of having your images showing automatically.
-
When images are uploaded in the assets folder of your nuevoMailer installation.
This option is set at Sender profile level. You enable this setting and you use the Images file manager to upload them in your assets folder.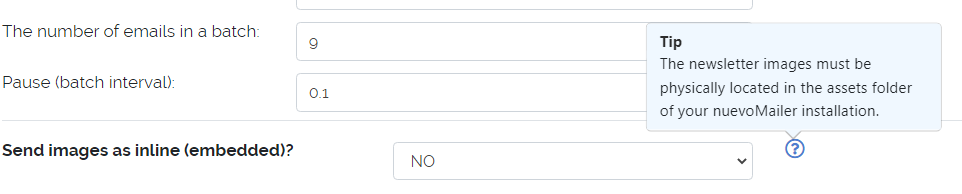 After sending the newsletter, if you look inside the code you will see something like:
<img src="cid:8d54879e4627459@www.domain.com" width="" height="">
Note:
To learn more about sending images as inline or embedded in newsletters visit this page.
- Sending images as inline is more resource consuming and may decrease the speed of mailing.
- Some email clients may still block images from showing unless the user explicitly downloads them.
- One downside may be that since the subscriber can see the images she may not be inclined to explicitly allow image downloading and therefore the "open" is not captured.
Importing HTML & Templates
When you have prepared your newsletter in another application you have several ways to move it to nuevoMailer.
- Copy-paste HTML code
Click on the HTML editor's button < > that says "Source code".
What you see is the complete HTML code between the <HTML>, </HTML> tags. You can paste directly your own code and you can also save code in the <head> part. You can add styles and css in your newsletter.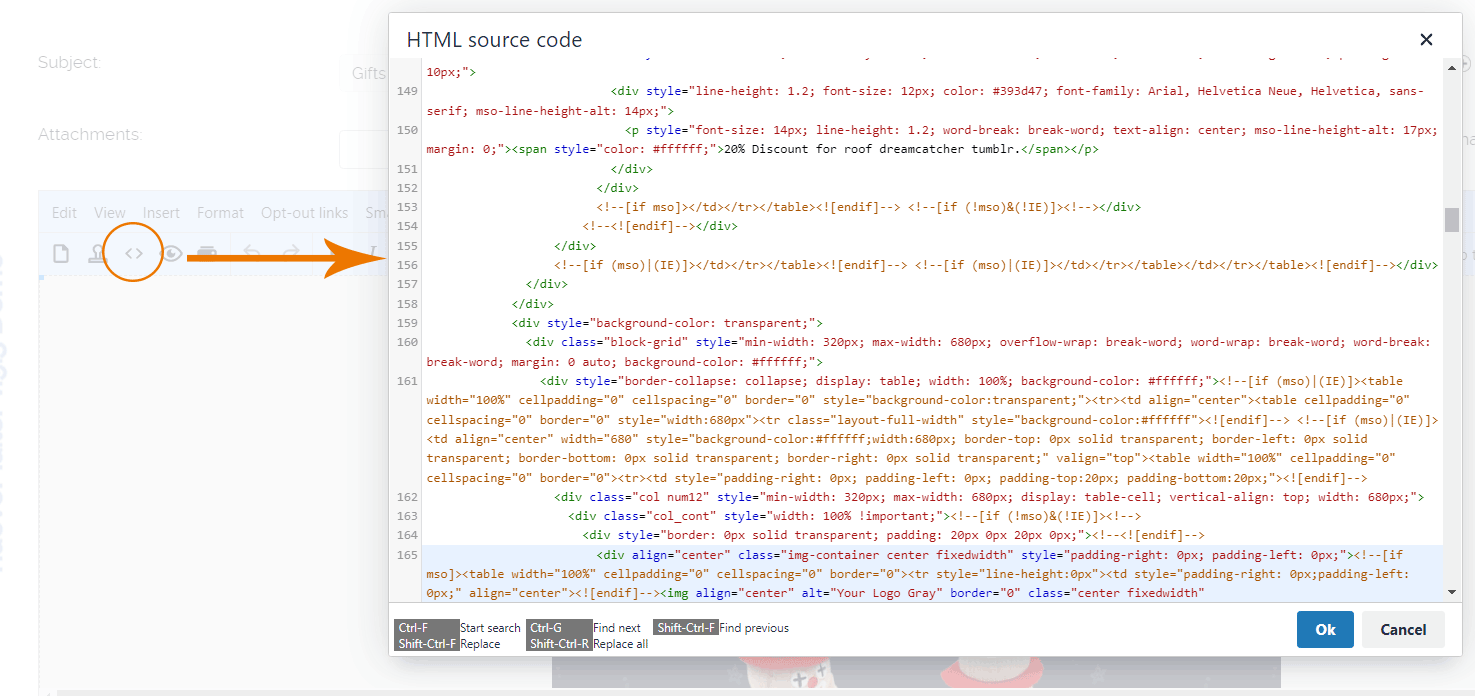
- Templates manager
Clicking on "Templates" opens the "Templates manager".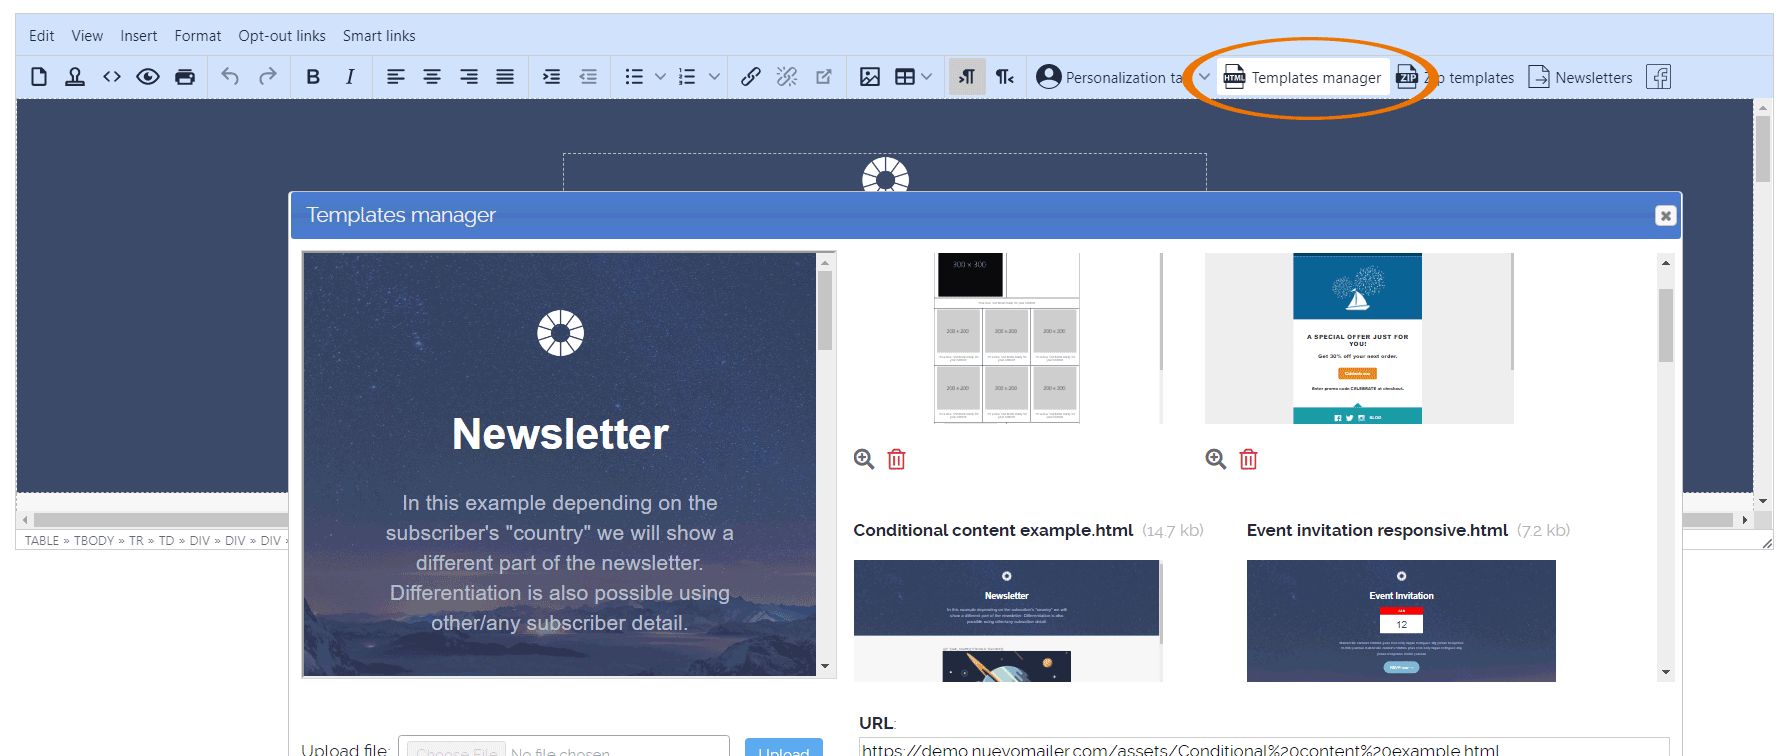
You can upload and use as templates .html and .htm files.
With the templates manager you can also grab a web page from a remote URL and save it as a newsletter.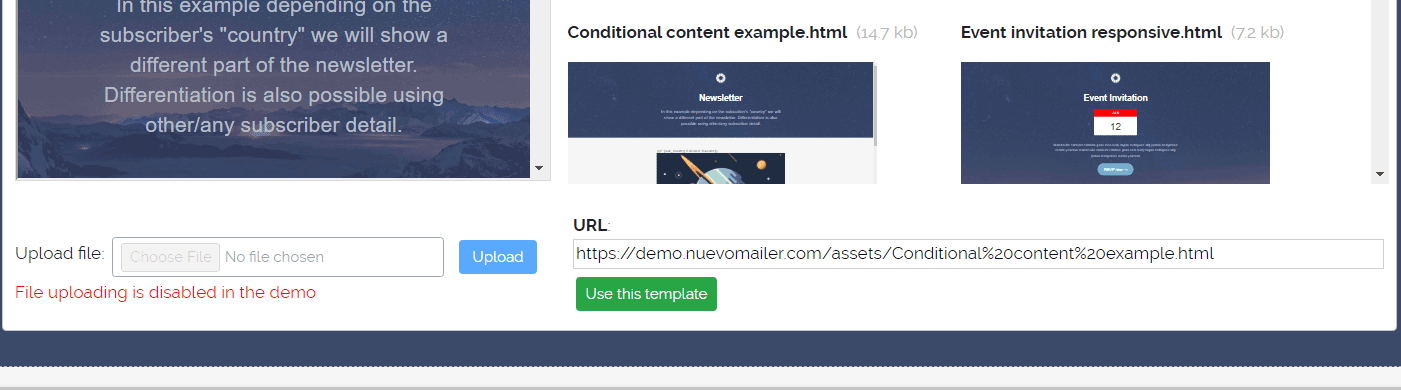
- Import zip templates from other editors
You can import newsletters as zip files that were made using these popular editors: designmodo.com, topol.io, Stripo, chamaileon.io, BEEFree, BEEPro, MailChimp and more.
Image paths are adjusted automatically and the images are uploaded in your assets folder.
And not only,
Your zip must contain an .html or .htm file and a folder named "images". Image paths in the html file should be like src="images/" or src="./images/".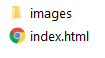

Social media links
The “Social media links” window appears when you click the icon at the left corner:
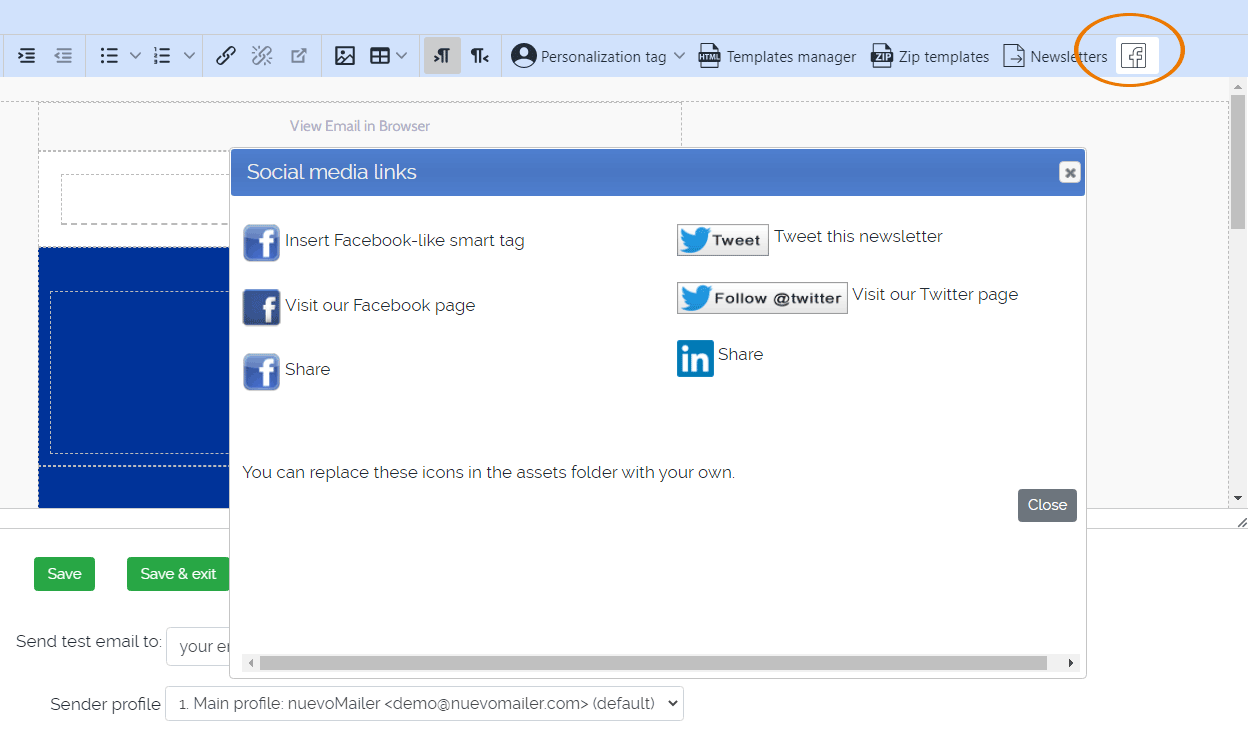
If you need to use different icons then you can replace them. They can be found in the assets folder. Remember to keep the same file names.
If you need to use different icons then you can replace them. They can be found in the assets folder. Remember to keep the same file names.
You must also enter some related values in Menu > Tools > Configuration & settings: General settings

Every time you “view a newsletter” in your browser a Facebook dialogue appears like in the picture below.
If you want to change the language of this dialogue then look inside the file inc/settings.php.

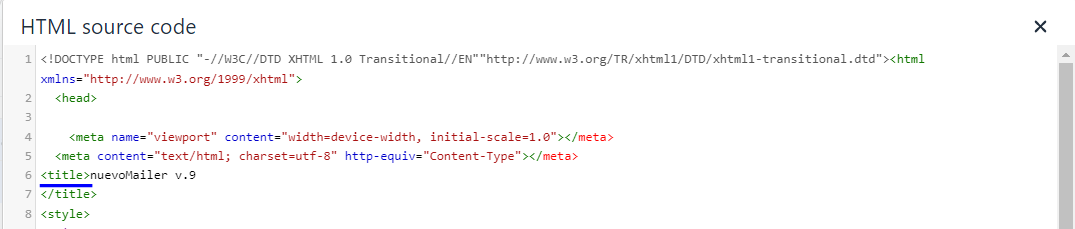
In Html newsletters it is advised to use the <title> meta tag (like you do with a web page). This tag appears when you read the newsletter in your browser. The result is that when a subscriber “likes” your newsletter then inside his Facebook wall it will appear as “Don Giovanni likes Newsletter by Acme Inc“.
Without the <title> meta tag, instead of “Newsletter by Acme Inc” you would see the URL of that page.
Here is the <head> part of a newsletter with a <title> meta tag:
Smart links
In the html newsletter editor you have some buttons to insert some special Smart links:
In addition you can insert some more special links using this option:
-
Link to your privacy policy
You can edit your "Privacy" page by going to Menu>Newsletters>Privacy page.
This page is in the subscriber folder of your nuevoMailer installation.
In text newsletters you can simply type : [privacy_link]. -
Read this newsletter in your browser (Html / multipart)
This is a dynamically generated page located in the subscriber folder of your nuevoMailer (newsletter.php).
It is a good practice to start a newsletter with this link at the very top:- Email clients may block images from appearing. When you read the newsletter in a browser images will appear.
- It feels better to read a newsletter in a big window. The newsletter looks nicer.
- It is safer in cases where the subscriber's email client is old or problematic (cannot render html, css etc).
- The view of this page is captured. All clicks from this page are captured. So your campaign statistics are updated.
- Tip: when sending multipart you can use [browser_link] in the text newsletter to click and load the html newsletter in the browser. You can see an example here.
-
Forward this newsletter to your friends (Html/Text)
When your subscriber clicks this link he goes to an existing page of nuevoMailer where he can forward this newsletter to 5 other email accounts.
The forwards are captured and you can see them in your campaign summary report.
For text newsletters use: [friends_forward]. -
Link to your newsletter archive (Html/Text)
The Newsletter archive is a dynamically generated page where all newsletters that are set as "public" are displayed.
You can dynamically embed the newsletter archive in any web page using the api. - Rating links (Html)
This feature can be used for two purposes:- As the name implies you can use it to ask subscribers to rate a newsletter. For example: Level 1 may be “bad”, Level 2 “average” and so on.
- You can use it for simple voting/polling with only one question and (up to) 5 possible answers. Each possible answer corresponds to a Level.
To see the rating results go to Menu > Reports > Newsletter ratings. You will find more explanatory notes in that page.
You can change the wording of the links if you like. - Insert a confirmation link
This is the link to use in your "confirmation-required emails" when double opt-in is active. The subscribers click this link and become confirmed (verified). - Insert Company Logo
If you have defined your logo in your settings and uploaded it in your assets folder then you can use this link to insert it. This logo is the same as the one you will see at the top-left corner of the administration panel.
Note:
Some smart links work only in campaigns. They are not rendered when sending a single test newsletter. But a test email shows you if the link is correctly formed. So sending a test email always helps. This same applies to smart tags, opt-out links and views/clicks tracking.
Some smart links work only in campaigns. They are not rendered when sending a single test newsletter. But a test email shows you if the link is correctly formed. So sending a test email always helps. This same applies to smart tags, opt-out links and views/clicks tracking.
Newsletter tags
- In order to facilitate the management of your newsletters you can create tags (categories) and tag your newsletters.
You can use your own tags in your own language.
- You can set the default newsletter tag in Menu > Tools > Configuration & settings

And this will automatically filter your newsletters. If you cannot see a newsletter that you have just created change the Tag above to "All". Remember to tag your newsletters in this case.
- You can assign multiple tags to a newsletter.

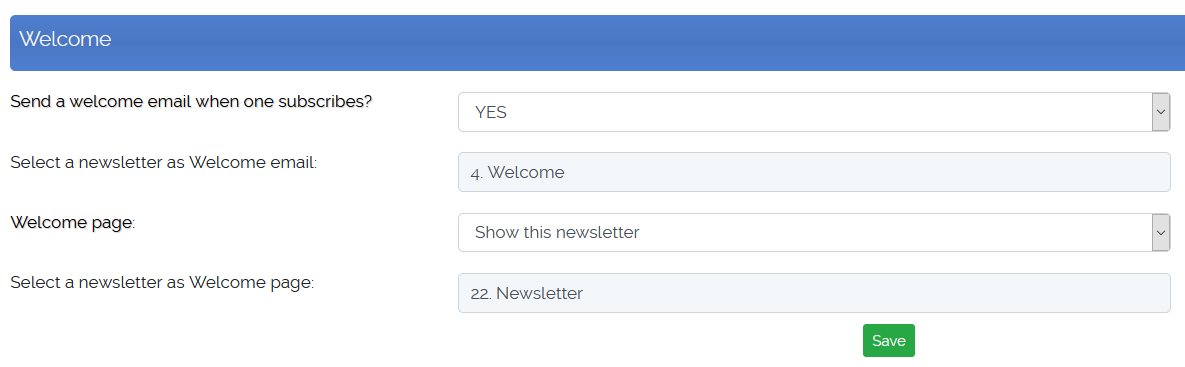
Welcome & goodbye emails & pages
With nuevoMailer v.9.5 these are set at Sender profile level.
Landing pages are those that your subscribers see after an opt-in/-out and after clicking a confirmation link.
Similarly, greeting emails are those that are sent before or after the above actions.
With nuevoMailer you can use newsletters for both of them. Before setting up the landing pages and greeting emails you must first create some newsletters that you will use as such.
Good to know
- Instead setting up landing pages you can use your own by defining redirection URLs.
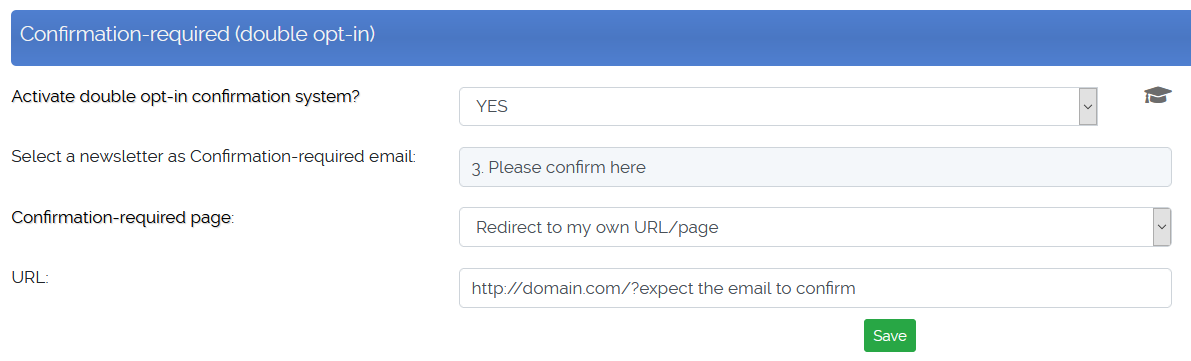
- You can disable the "welcome" and "goodbye" emails but not the "confirmation-required" email since it is
required in order to confirm a subscription (when double opt-in is active).
- Personalization: you may personalize the landing pages and emails (with subscriber details) and also use smart tags (but not when you use redirection URLs).
- You can learn more about double opt-in here.
Link to other newsletters
Sometimes you want to present more content to your subscribers without overloading your newsletter.
RSS feeds
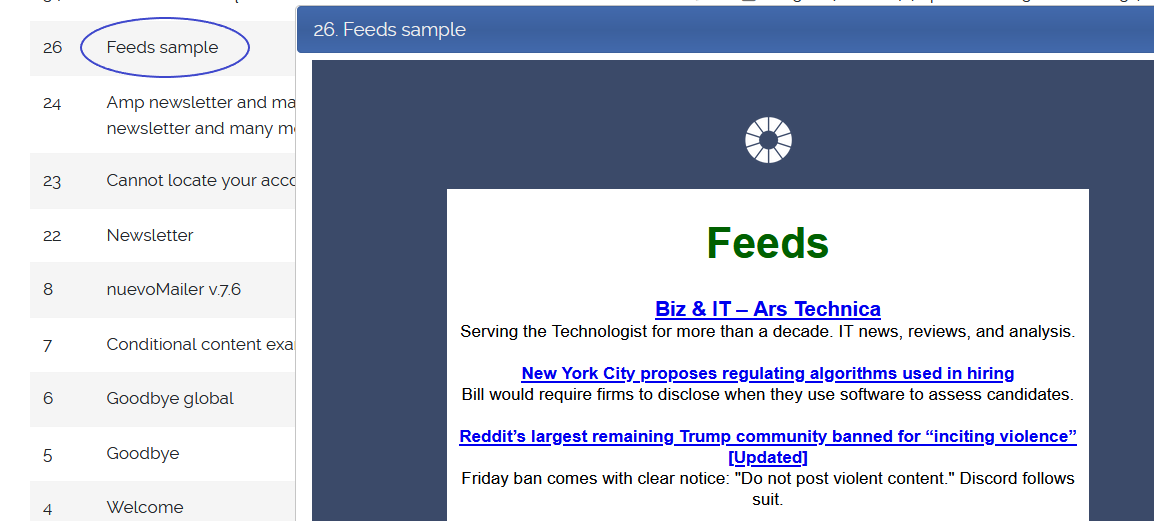
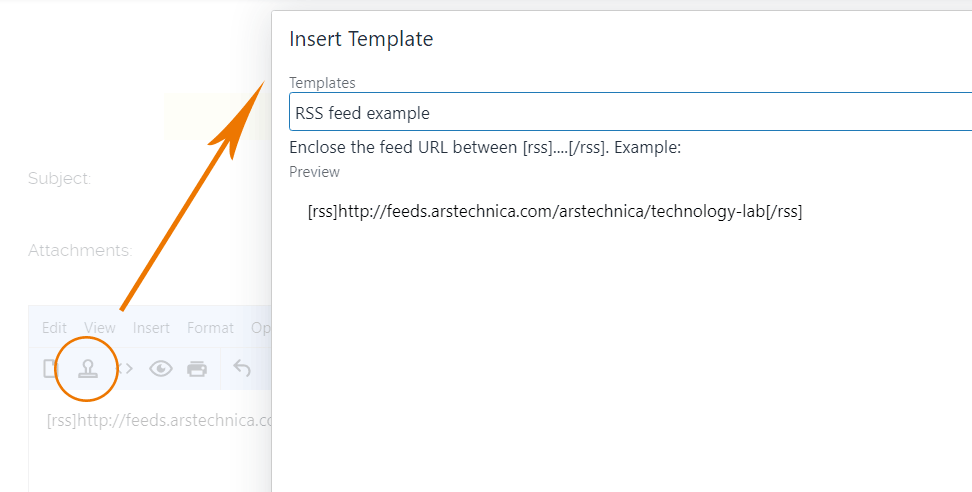
You can embed RSS feeds inside an html newsletter. This is done simply by typing this inside a newsletter:
[rss]http://feed-url[/rss]
Here is a real example. Look at the highlighted part inside the newsletter.
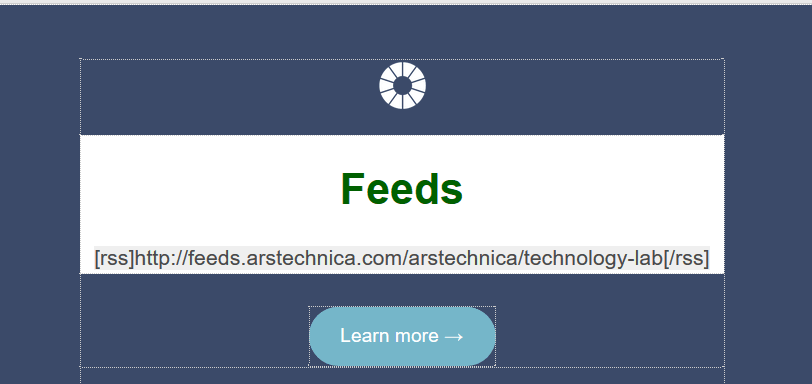
Then open the newsletter in preview:
[rss]http://feed-url[/rss]
Here is a real example. Look at the highlighted part inside the newsletter.
Then open the newsletter in preview:
- You can embed many RSS feeds in the same newsletter.
- Clicks-tracking for the RSS hyperlinks works just like with other newsletter links.
- The appearance and styling comes by the feed itself. But you can also do some customization in the file /inc/rss.php.
- Here is a quick reference:
Spintax
You can enable the Spintax feature in Menu > Tools > Configuration & settings
 The term spintax is a short for “spinning syntax”.
Words or phrases enclosed in [spin]...[/spin] and separated with | will randomly alternate when sending the newsletter.
You can use Spintax both in your newsletter subject and body.
Example
In your newsletter you write something like this:
The term spintax is a short for “spinning syntax”.
Words or phrases enclosed in [spin]...[/spin] and separated with | will randomly alternate when sending the newsletter.
You can use Spintax both in your newsletter subject and body.
Example
In your newsletter you write something like this:
[spin]Sending|Creating[/spin] [spin]emails|newsletters[/spin] is good for [spin]email marketing|getting sales leads[/spin]- Sending emails is good for email marketing.
- Sending newsletters is good for getting sales leads.
- Sending newsletters is good for email marketing.
- Sending emails is good for getting sales leads.
- Creating emails is good for email marketing.
- Creating newsletters is good for getting sales leads.
- Creating newsletters is good for email marketing.
- Creating emails is good for getting sales leads.
- ...and so on.
New syntax from version 7.6:
[spin]Sending|Creating[/spin] [spin]emails|newsletters[/spin] is good for [spin]email marketing|getting sales leads[/spin].
Deprecated syntax:
{Sending|Creating} {emails|newsletters} is good for {email marketing|getting sales leads}.
[spin]Sending|Creating[/spin] [spin]emails|newsletters[/spin] is good for [spin]email marketing|getting sales leads[/spin].
Deprecated syntax:
{Sending|Creating} {emails|newsletters} is good for {email marketing|getting sales leads}.
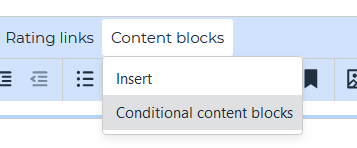
Conditional content blocks
With conditional content blocks you can differentiate parts of a newsletter based on subscribers' properties.
In other words you can send different content to different subscribers within the same newsletter/campaign.
In other words you can send different content to different subscribers within the same newsletter/campaign.
Since nuevoMailer v.10 you have a builder to create such blocks.
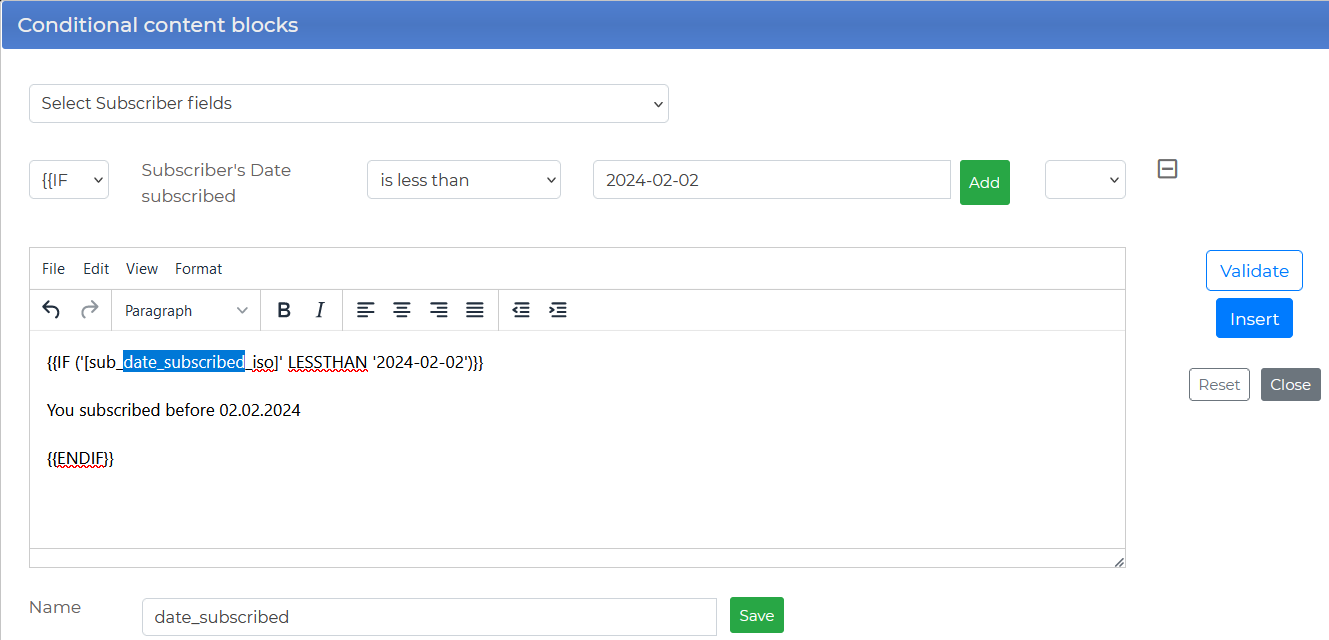
- You can use all subscriber fields including your custom ones.
- Depending on the field type the menus with the available conditions are adjusted accordingly. You have different options for numeric/text/date fields.
Here are some examples. [sub_field] is the Personalization tag for a custom subscriber field.
An example
Available control structures and operators
Key points
Working with empty or null values
Let's assume you don't know your subscriber's last name. How can you use conditions in this case?
Assume this is your last name custom field setup.
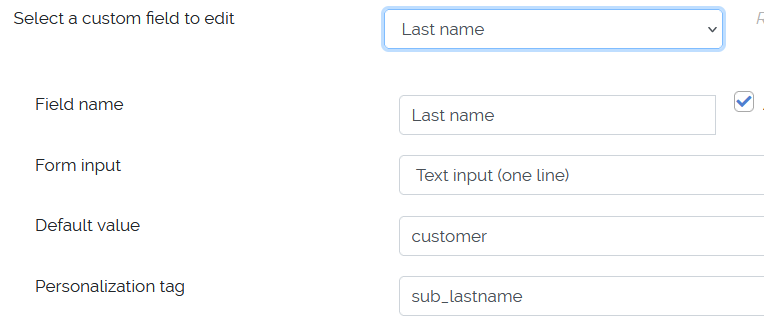
The Default value and the Personalization tag are important.
Here is a code sample for your newsletter:
In other words, when there is no value for 'last name', [sub_lastname] which is the personalization tag, will take the value 'customer' which is the default/fall-back value.
Therefore the above condition will be evaluated as,
IF 'customer' EQUALS 'customer'
        {{IF '[sub_field]' EQUALS 'value-1'}}

                  <!--  ......content goes here...-->

        {{ELSEIF '[sub_field]' EQUALS 'value-2'}}

                  <!--  ......other content goes here...-->

        {{ELSEIF '[sub_field]' EQUALS 'value-3'}}

                  <!--  ......different content goes here...-->

        {{else}}

                  <!--  ......content goes here...-->

        {{endif}}
            {{IF ( ('[sub_country]' EQUALS 'Sweden') AND ([sub_age] LESSTHAN 39)  ) }}

              You are less than 39 from Sweden

            {{ELSEIF ( ('[sub_country]' EQUALS 'Sweden') AND ([sub_age] GREATERTHANEQ 40)  ) }}

              How's life in the Sweden for 40 plus?

            {{ELSEIF ( ('[sub_country]' EQUALS 'Norway') AND ([sub_age] LESSTHAN 39)  )}}

              You are less than 39 from Norway

            {{ELSEIF ( ('[sub_country]' EQUALS 'Norway') AND ([sub_age] GREATERTHANEQ 40)  ) }}

              How's life in the Norway for 40 plus?

            {{else}}

              You are never too old at [sub_age].

            {{endif}}
An example
- This newsletter has 3 different parts depending on subscriber's country.
- Click here to see the newsletter in full code (un-rendered).
- And here to see it rendered. Since we do not have a value for subscriber's country the last part is only displayed.
Available control structures and operators
| Syntax | Description |
| {{IF | This is the starting point. Should be followed by a condition and close with }}. |
| {{ELSEIF | Same as above for an alternative condition. A condition must follow and close with }}. |
| {{ELSE}} | No condition follows here. The newsletter parts that follow will display when all other conditions have failed. |
| {{ENDIF}} | This is the ending point of the block. |
| EQUALS | Means equals. Can be used for text / numeric / date fields.
Text & date fields should be enclosed with single quotes '. Example: '[sub_country]' EQUALS 'Sweden'. Quotes are not required when comparing numeric fields & values. Example: [sub_age] GREATERTHANEQ 40 |
| NOT_EQUALS | Means does not equal. Can be used for text / numeric / date fields.
Same as above, use single quotes when comparing text or date values. |
| CONTAINS | Can be used for text fields. |
| STARTS_WITH | Can be used for text fields. |
| ENDS_WITH | Can be used for text fields. |
| LESSTHAN | Stands for less than. Can be used for numeric & date fields. |
| LESSTHANEQ | Stands for less than or equal. Can be used for numeric & date fields. |
| GREATERTHANEQ | Stands for greater than or equal. Can be used for numeric & date fields. |
| GREATERTHAN | Stands for greater than. Can be used for numeric & date fields. |
| AND | Means that both condition1 AND condition2 should apply. |
| OR | Means that either condition1 OR condition2 applies. |
| Conditional content based on Subscriber Tags (Since v.8.7) | |
|
With this feature you can show a segment of a newsletter only to subscribers that have the relevant tag. Here is how:
[start_tag_X] .....content for subscribers that have tag X will show here.......... [end_tag] Since v.9.8 you have an additional option: [not_tag_Z] .....content for subscribers that do not have tag Z will show here...... [end_tag] Where X, Z are Tag IDs. You can see the IDs in your Subscriber Tags page. |
|
Key points
- You can differentiate paragraphs, images or whole sections of a newsletter.
- Or you can show additional content to subscribers that fulfil certain condition(s).
- Your emails become more personal and targeted and this may positively affect readability, engagement and deliverability.
- You can use conditional content blocks both in html and text newsletter bodies (not subjects).
- At minimum you can have:
{{IF (condition) }} <!--...content...--> {{endif}} - If you want to use complex conditions with AND / OR you should use parentheses.
Working with empty or null values
Let's assume you don't know your subscriber's last name. How can you use conditions in this case?
Assume this is your last name custom field setup.
The Default value and the Personalization tag are important.
Here is a code sample for your newsletter:
            {{IF '[sub_lastname]' EQUALS 'customer'}}
            Please let us know your last name.
            {{else}}
            Your last name is [sub_lastname].
            {{endif}}
In other words, when there is no value for 'last name', [sub_lastname] which is the personalization tag, will take the value 'customer' which is the default/fall-back value.
Therefore the above condition will be evaluated as,
IF 'customer' EQUALS 'customer'
Preheaders - Preview text
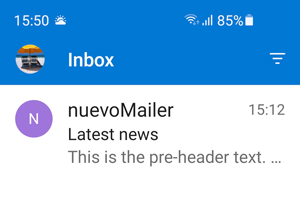
The terms Preheader & Preview text are used interchangeably. For some there is a distinction and it is matter of definition.
Anyway we call it this is what we refer to:
A short piece of text following the subject of an email when previewing it in the inbox.
Here is what it looks like:
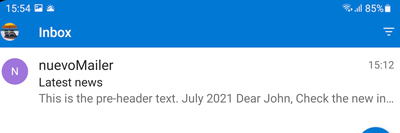
 And with a different orientation which allocates more space the preheader is extended.
Alternatively it can also be achieved like this:
Things to consider,
A short piece of text following the subject of an email when previewing it in the inbox.
Here is what it looks like:
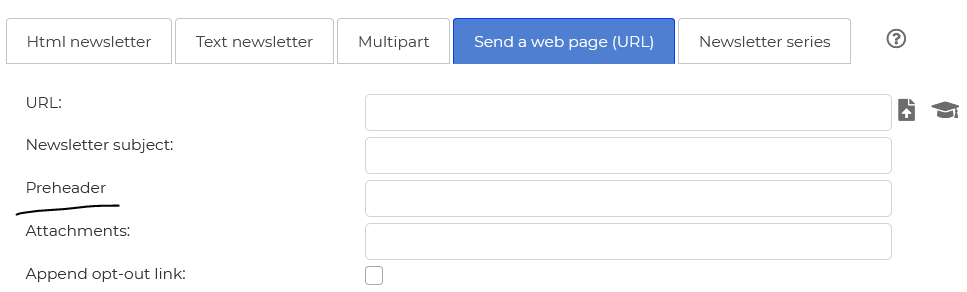
Since nuevoMailer v.9.6 you can add a preheader at your newsletter editing page:

Since v.10.0 you can also add a preheader when sending a page using the URL here:
For older nuevoMailer versions or in the case of sending a page using the URL, putting this piece of code after the <body> html tag creates a preheader.
<body>
<!--[if !mso 9]><!-->
<span style="display:none !important;visibility:hidden;opacity:0;color:transparent;height:0;width:0;">This is the preheader text and then some space.‌ ‌ ‌ ‌ ‌ ‌ ‌ ‌ ‌ ‌ ‌</span>
<!--<![endif]-->Alternatively it can also be achieved like this:
<body>
<div style="display:none;">Your preview text goes here</div>
Things to consider,
- We cannot know how much of the preheader the email client will show neither how much space it will allocate.
- What you see in one email client may differ in an another email client.
- In the absence of a preheader or in case of a short preheader the email client will show the first text it finds inside the newsletter body. The second picture above demonstrates this.
- So in case we don't want any of the newsletter body text to show in the preheader we use ‌ to add white space after the preheader text.
- We may use very long preheaders or shorter ones with a lot of "after” white space or any combination.
- Experiment until you are satisfied. Add a preheader to a real newsletter with actual content. Open it in 2-3 different email clients and adjust accordingly.
- nuevoMailer v.9.6 adds a considerable amount of white space. You can increase it in the file /inc/classUtil.php.
Good to know
You can personalize your preheaders using merge tags like [sub_fname] just like you do with the main newsletter body.
You can personalize your preheaders using merge tags like [sub_fname] just like you do with the main newsletter body.
Countdown widget
Since nuevoMailer v.9.8
A countdown timer is a nice way to create urgency, boost engagement and drive sales.
It encourages your subscribers to take action.
It encourages your subscribers to take action.
This is the minimum code required to embed a countdown timer in your newsletter. You only need to set the until option.
Insert the code in a newsletter and open the newsletter in the preview pop-up to see how the timer looks.
Then make adjustments in your default settings until you are satisfied with the result.
[COUNTDOWN until="2023-06-29+00:01:01"][COUNTDOWN until="2023-06-29+00:01:01" width="400" height="110" boxColor="0062CC" font="Lato-Regular" fontColor="FFFFFF" fontSize="40" xOffset="90" yOffset="70" labelOffsets="1.1, 3.9, 6.4, 9.1" fallbacktext="Ended"]Insert the code in a newsletter and open the newsletter in the preview pop-up to see how the timer looks.
Then make adjustments in your default settings until you are satisfied with the result.